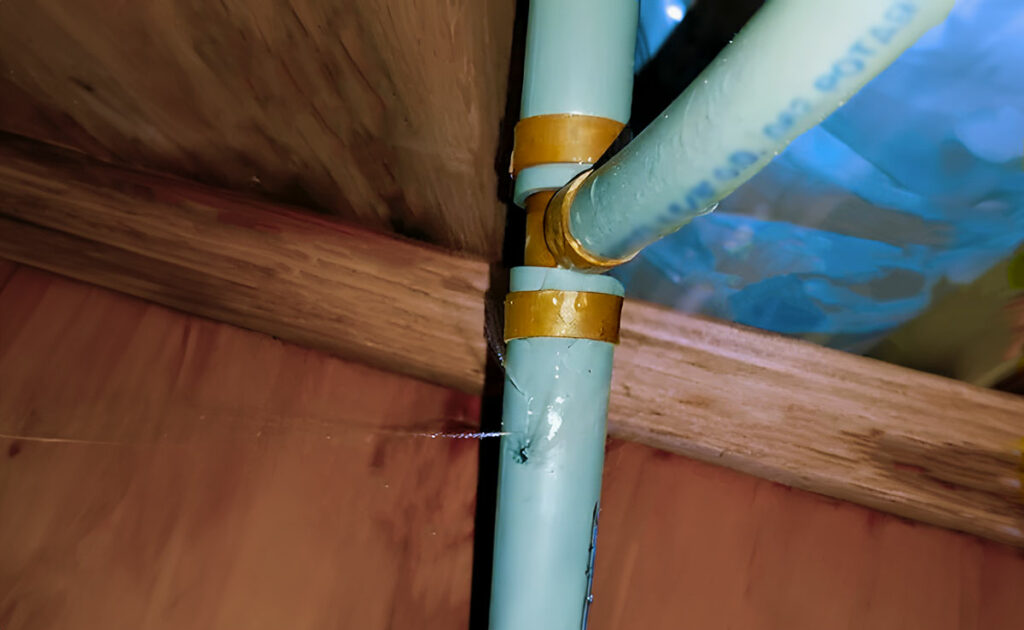
If you own a manufactured home or really any home from the 80’s or early 90’s, your home may have the gray plastic waterlines called polybutylene (PB). Due to some shortcomings in the PB, it is no longer made and has been replaced with PEX.
Before you can begin the repair process, you must first identify whether your gray plastic polybutylene waterline is indeed damaged. Look out for these telltale signs:
- Water Leaks: Obvious water leaks or puddles around the waterline area.
- Reduced Water Pressure: A noticeable decrease in water pressure throughout your home.
- Strange Odors: Unpleasant odors coming from the water or waterline area.
- Discolored Water: Water that appears brown or discolored when it should be clear.
Gathering Your Tools and Materials
What You’ll Need
To get started with the repair, gather the following tools and materials:
- Pipe Cutter: Cleanly cut the damaged section of the PB waterline.
- Replacement PB Pipes: Ensure you have enough to replace the damaged segment.
- Crimping Tool: To secure the connections.
- Safety Gear: Safety glasses, gloves, and a dust mask for protection.
- Tape Measure: For accurate measurements.
These repairs are generally best done by replacing the damaged sections (or the entire plumbing line network) with PEX. Once only available in clear or white, pex can now be found in a variety of colors including red, blue, white, and clear. Because so many manufactured homes still contain gray polybutylene, repairs are still necessary.
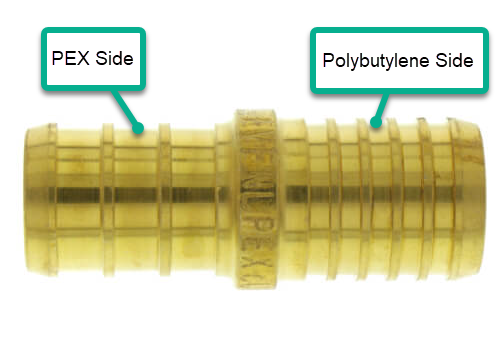
Since parts for polybutylene systems are no longer available, repairs have to be made using pex. The repairs are simple, you just have to remember that anytime you connect pex to polybutylene, you need a ‘pex to polybutylene’ adapter which are generally available anywhere pex fittings are sold.
Besides being a different diameter, the polybutylene side of the fitting contains a lot more rings than the pex side. Do not use a regular ‘pex to pex’ coupler as the inside diameter of polybutylene is larger.
In the photo above, on the right side of the ‘pex to polybutylene’ adapter is the polybutylene connection. Notice how it’s thicker and has more rings.
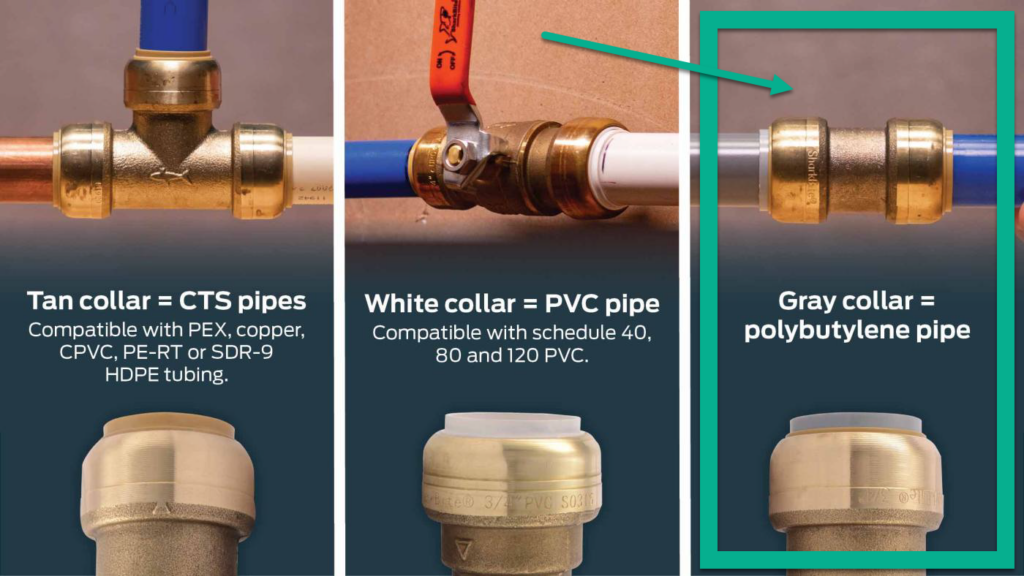
Alternatively, there are push to connect fittings from brands such as “Sharkbite” that can work too (shown above). However, keep in mind that you need specialty versions that are designed specifically for polybutylene pipe.
Steps to Repairing a Gray Plastic Polybutylene (PB) Waterline
Now, let’s dive into the step-by-step process of repairing your gray plastic PB waterline:
Step 1: Safety First
Before you begin any plumbing repair, ensure your safety. Wear appropriate protective gear, and if you’re unsure about any aspect of the repair, consult a professional plumber.
Step 2: Turn Off the Water Supply
Locate your main water shut-off valve and turn it off to prevent any further water flow into the damaged line.
Step 3: Drain the System
Open faucets at the lowest point in your home to drain any remaining water from the pipes.
Step 4: Identify and Mark the Damaged Section
Use your tape measure to pinpoint the damaged section accurately. Mark it for later reference.
Step 5: Cut Out the Damaged Portion
Using the pipe cutter, carefully remove the damaged portion of the PB waterline. Ensure the cut is clean and even.
Step 6: Prepare the Replacement Pipe
Measure and cut a replacement PB pipe to the exact length needed. Ensure it’s clean and free from debris.
Step 7: Connect the Replacement Pipe
Using your crimping tool or appropriate connectors, secure the replacement pipe in place, ensuring a watertight connection.
Step 8: Seal the Joints
Apply PVC adhesive or plumbing tape to seal the joints and prevent leaks.
Step 9: Turn On the Water Supply
Slowly turn on the main water supply and check for any leaks or issues.
Step 10: Test the Repaired Waterline
Run water through the repaired section to ensure it functions correctly.