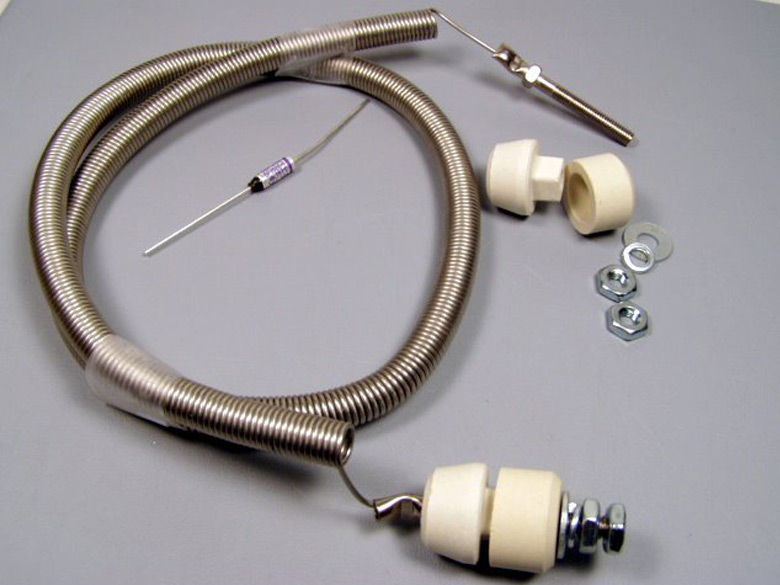
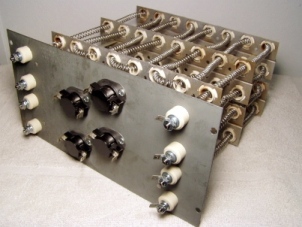
Since many older heating elements are no longer available, your only option may be to repair them using a properly sized restring kit. Restringing an element simply means replacing the heating wire with a new one. New limit switches and/or fuses should also be installed.
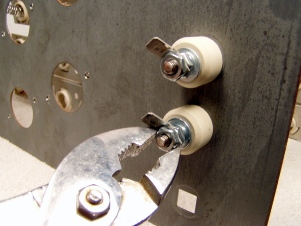
Correct wattage, voltage and type of ends (bolt or spade) should be verified before ordering. Some elements require two or more kits. Check for cracked or broken ceramic insulators. Some styles of replacement insulators are available here.
To determine the correct wattage, add up the Killowats (KW’s) of the coils. The total should be near or above the total Kilowats (KW’s) of your furnace. For instance, if you have a 10KW furnace with two coils, then you’ll need two 5KW coils. Remember, 1000 watts equals 1 KW.
If you find your coils burned or the limit switches constantly tripping, the cause may be that the coils aren’t getting enough air and getting too hot. Be sure your filters are clean. Maintaining a clean furnace is also important in ensuring proper airflow over your heating elements. A limit switch that’s constantly tripping may be caused by the coils being too close to the limit (see helpful tip below).
Some restring kits come with a fuse. If your element already includes a limit switch, the fuse may not be necessary.
Do-It-Yourself Restringing Instructions
Before starting, be sure you have all the parts you need to complete the job. This includes one restring kit for each coil, and we recommend new limit switches. Correct wattage and voltage should be verified. We also recommend using rubber gloves when handling the new coils as you don’t want to get any oil & dirt from your hands on them.
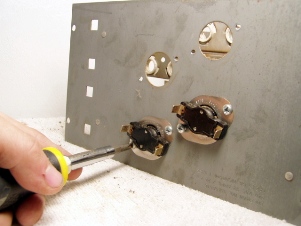
Step 1: Turn off electrical power to unit. You may have more than one circuit, so check for other breakers or fuses. Then disconnect the electrical connections to the unit after testing with a meter to ensure that indeed all the power has been cut.
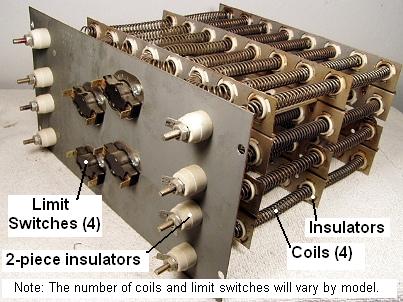
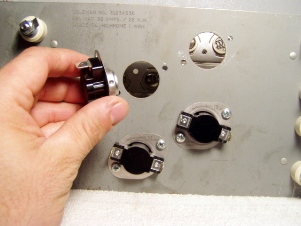
Step 2: Take careful notes on how the heating element is wired. Taking pictures is also a good idea. Nothing is more frustrating than trying to reinstall your heating element and not remembering where the wires go. Once the wiring is documented, remove the heating element or elements from the unit.
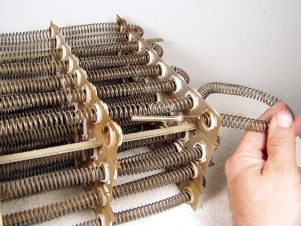
Step 3: Remove the coils from the old heating element. Keep one old coil in tact so you can figure the length to stretch the new coil. Otherwise, it may be easiest to cut the coils with a wire cutters for ease of removal. Be careful when removing as you do not want to break any of the insulators. Some styles of replacement insulators are available here. Again, make notes or take pictures as the new coil must be installed in the exact same pattern as the old one was removed.
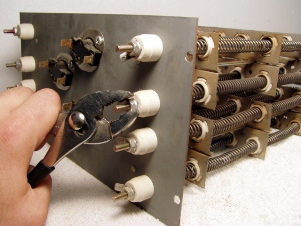
Step 4: Remove the old limit switches. Generally, they are held in place with 2 screws.
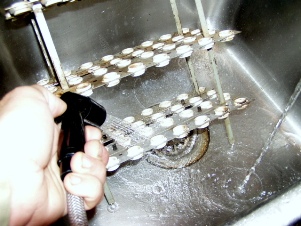
Step 5: With all the parts removed from the heating element, now is the time to give it a good cleaning. Warm soapy water in a kitchen sink and a faucet sprayer is one way of cleaning it. Dry completely before continuing.
Step 6: Wearing rubber gloves and working in a clean dry environment, stretch the new coil to the length of the old coil. In most cases, you are better to error on the side of being a little long than being a little short. Enlist a helper and stretch the new coil by holding onto the bolts on each end. Do not overstretch and take care not to damage the resistant wire. Carefully bend the wire on the end so the bolt or spade is straight with the coil.
Step 7: Carefully feed the coil through the ceramic insulators. With some models, the wire will hook to an insulator. You may need to slightly spread or squeeze the coil to connect to the insulator. It’s easiest to start in the middle and feed each side. Be sure the replacement coil feeds through the insulators the same way the old one did. Minimize sags and variations between insulators. Keep back from the limit switch.

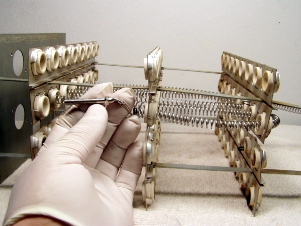
Step 8: Feed bolt or spade ends into face plate. Bolt ends will use a 2-piece ceramic insulator, washer & nut.
Step 9: Install a new limit switch or switches.
Step 10: Inspect assembly for a minimum of 3/8″ spacing between the coil and any frame or unit members. Doublecheck that all ceramic insulators & supports are in their original position and have not jumped out of place or broken. If all is OK, insert heating element back into unit and reconnect power.
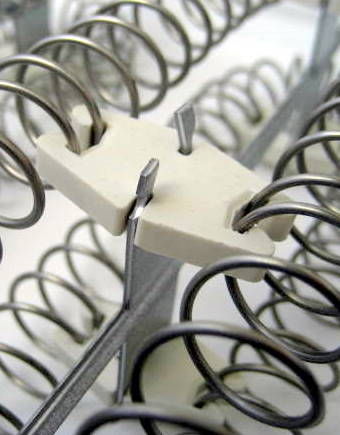
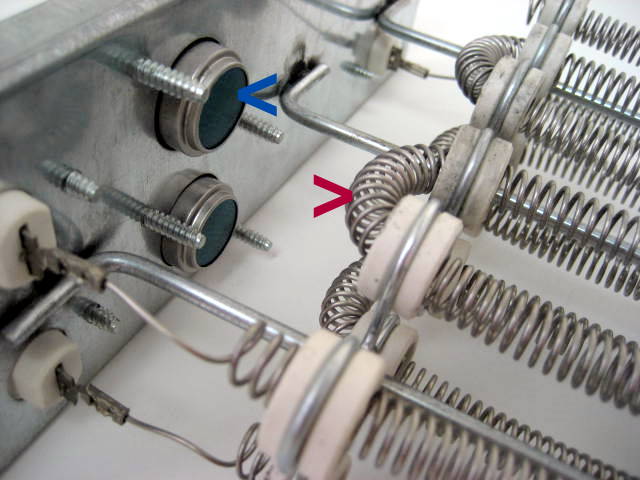
Tip: To minimize nuisance trips by the limit switch, keep the coil (red arrow) back from the limit switch (blue arrow) as correctly shown in this picture. Any extra coil length should be worked to the back of the element assembly. Also notice that this picture shows restring kits with spade ends.
Repairable Heating Elements
The following models of mobile home furnace heating elements are no longer available and can be repaired using our restring kits. If your model isn’t shown, it can still be repaired using our kits as long as the coil is accessible. Of course our kits will also repair residential and commercial electric furnaces, along with dryers and many other appliances.
Coleman Heating Elements (partial list)
3110-3361, 3110-5361, 3110A5361.
3112-3361, 3112-5361, 3112A5361.
3115-3361, 3115-5361, 3115A5361, 3200-5361, 3200A5361, 3200-3391.
3118-3361, 3118-5361, 3118A5361.
3120-3361, 3120-5361, 3120A5361, 3120B5361.
3123-3361, 3123-5361, 3123A5361, 3123B5361.
3200-3261, 3200-3391, 3200-5361, 3200-6261, 3200-8301, 3200A5361, 3200A6261.
Most 3300 series heating elements.
3400-3321, 3400-3331, 3400-3341, 3400-3351, 3400-3361, 3400-3371, 3400-3381.
3400-3481, 3400A4201.
New 3500 series heating elements are still available.
Nordyne-Intertherm-Miller Heating Elements (partial list)
432721, 432722, 432723, 432731, 432732, 432733.
4327210, 4327220, 4327230, 4327310, 4327320.
6316480, 6316470.
631690, 631691, 631692, 631693, 631694.
6316900, 6316910, 6316920, 6316930, 6316940.
902818, 902819, 902820, 902821, 902822, 902823, 902824.
Some heating elements for Mac furnaces.