It took alot of work but I got the new metal roof on! I ran into a problem with the rake trim not fitting correctly so I have to work that out. I also have to finish sealing up the vent pipes etc. but I posted some pics of the entire project from start to finish in my profile.
I'm so glad I decided to tear off the old shingles insead of doing the roof over. After I removed the first layer of shingles I could see that the originals were soaked. I had to replace a dozen sheets of decking.
Thanks for all of your advice!
Almost there!
Moderators: Greg, Mark, mhrAJ333, JD

Hi,
Always a good idea to take the extra time to do the job right! Good thing you did just that.
Looks good, as always thanks for the pics!
Yanita
Always a good idea to take the extra time to do the job right! Good thing you did just that.
Looks good, as always thanks for the pics!
Yanita
The difference between success and failure is who gives up first!


The roof looks great! After the tear-off of old shingles did you replace much sheathing other than that corner you showed?
JD
JD
☯JD♫
Today is PERFECT!
All information and advice given is for entertainment and informational purposes only. The person doing the work is solely responsible to insure that their work complies with their local building code and OSHA safety regulations.
Today is PERFECT!
All information and advice given is for entertainment and informational purposes only. The person doing the work is solely responsible to insure that their work complies with their local building code and OSHA safety regulations.
Thanks JD! I had to replace a total of 12 sheets! All of the boards along the eaves on both sides and the one around the roof jack! All I have left to do now is figure out how I'm going to set the rake trim. The ones that I bought with the system are made for a 2x8 or a 2x10 rake board and mine are only a 2x6 so the nailer is hanging in mid-air. I'm going to take a better look this weekend and see if I can add a board to the rake so the trim will fit.
I also need to find an extension for the roof jack at the roof line. Robert is trying to locate one for me. There's not enough of it left over the roof line for me to put the boot on.
I also need to find an extension for the roof jack at the roof line. Robert is trying to locate one for me. There's not enough of it left over the roof line for me to put the boot on.
Whatever It Takes
I am sure Robert will get you the right part. The parts and support service he offers online is truly unique. I couldn't get that kind of service from the local suppliers from my own town.
One idea on the rake trim. Can you take that back and trade it in for corner trim? Corner trim is would fit your gable board. That is what I used for rake trim when I used to build pole barns. This was the same design from the 4 different compaines I pulled plans for. But ripping a board to fit the rake trim shouldn't be too difficult either. May even look better.
JD
☯JD♫
Today is PERFECT!
All information and advice given is for entertainment and informational purposes only. The person doing the work is solely responsible to insure that their work complies with their local building code and OSHA safety regulations.
Today is PERFECT!
All information and advice given is for entertainment and informational purposes only. The person doing the work is solely responsible to insure that their work complies with their local building code and OSHA safety regulations.
I just looked at the manufacturers website for the corner trim profile. They have all of the dimensions and I think you're right. That might fit perfectly. I will measure everything up this weekend and verify and then see if they will take it back. It wont work on the front of the house though. On the first side that we started, we got out of square and we had to angle cut the last piece. The panels were moving slightly when I drove the first screw in and didn't realize it until it was too late. There is also no high rib at the edge so I'm not sure how I'm going to deal with that yet.
I posted a couple of pics. of the rake trim that I currently have for you to see.
I posted a couple of pics. of the rake trim that I currently have for you to see.
Whatever It Takes
Did you cut that last panel to fit the framing already? If not, you might be able to bend a 1" high lip on the panel. You definitely want some kind of lip there to channel any water that gets in there. Also, using butyl rubber window tape under the gable trim might help. It must be the butyl type and not the standard light gray window putty tape.
JD
JD
☯JD♫
Today is PERFECT!
All information and advice given is for entertainment and informational purposes only. The person doing the work is solely responsible to insure that their work complies with their local building code and OSHA safety regulations.
Today is PERFECT!
All information and advice given is for entertainment and informational purposes only. The person doing the work is solely responsible to insure that their work complies with their local building code and OSHA safety regulations.

Harry, the panels I used were made by American Building Components. Their website is;
www.abcmetalroofing.com
They have various locations throughout the US. The closest distributor to you looks like Adel, Georgia but they ship anywhere.
The panels I used were 26ga. PBR. I ordered them full length at 14.5ft. but in retrospect it would have been easier to handle if I did it in 2 pieces.
JD - The last panel was only 8 -10 inches wide so I have enough of the remnant left to try something else. I'm wondering now if I could cut another piece leaving the high rib stright along the gable edge and cutting the angle on the inner portion. If I could do that and the supplier would take back the rake trim, I could use the corner trim on both gables.
Whatever It Takes
I have looked at your panel and figure you should have 1-1/2" to 2" of the flat section of the panel overhanging the rake before it gets to the next rib. If so, and if I were doing it, I would have someone hold a 2x4 hard against the metal on top and even with the rake, and use a mallet to bend that flat section down. This way there are no breaks or screws on the top under the trim and it would seal that edge of the metal over the gable wood or trim. If you want to do it real nice, use the butyl tape under and over the metal you bent and then cover the outside tape with a termination bar. You can use most any extruded 1" or so aluminum bar like the picture below. It should have some type of profile like the one in the picture. J-channel would probably also work. You can get the termination bar at most roofing supply houses. You could probably find some thing that would work at the box stores. It is just flat bar that has enough strength to lay flat when screwed every 4" or so. With the bar and butyl tape being shielded from the sun, it should last 50 years or more.
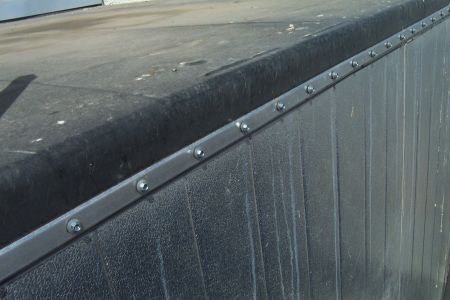
I think lthis would be better than bending in a lip, because then you would need to seal that joint under the bend. JMO
I wouldn't use anything other than the factory leading edge on the inside edge of the 8-10 inch end panel.
JD
I think lthis would be better than bending in a lip, because then you would need to seal that joint under the bend. JMO
I wouldn't use anything other than the factory leading edge on the inside edge of the 8-10 inch end panel.
JD
☯JD♫
Today is PERFECT!
All information and advice given is for entertainment and informational purposes only. The person doing the work is solely responsible to insure that their work complies with their local building code and OSHA safety regulations.
Today is PERFECT!
All information and advice given is for entertainment and informational purposes only. The person doing the work is solely responsible to insure that their work complies with their local building code and OSHA safety regulations.
-
- Similar Topics
- Replies
- Views
- Last post
-
-
A message to the MH builders out there
by Mark440 » Sat Oct 10, 2020 1:37 pm » in Mobile Home Repair - 3 Replies
- 42726 Views
-
Last post by Mark440
Sat Oct 10, 2020 7:31 pm
-