After reading that my idea for gym flooring in a bathroom would not be recommended I started looking around at other ideas. I am on a real tight budget, but I am good with my hands. I am also a pretty good painter.
I think that in my little guest bathroom I am going to try painting the plywood floor. There are some uneven places in the plywood and a seam or two. My idea is to Bondo the seams and sand the floor as flat and smooth as I can, then prime it. Then I could go a couple of different ways... bear with me...
1. I could go for the industrial look by using a Truck Bed Liner (like the one made by Bondo) - http://www.3m.com/US/auto_marine_aero/B ... temNbr=687
2. I could paint it with some heavy duty oil base paint and do some sort of faux finish - even fake tiles.
Has anyone else tried this? Are there any special type of primers that I should use?
Any other suggestions for someone who has a very limited budget? Does this sound crazy?
Painted plywood floors - new idea
Moderators: Greg, Mark, mhrAJ333, JD

Hi,
I am going to move this topic to the decorating forums, follow us there.
There are many threads there that have some flooring ideas.
Yanita
I am going to move this topic to the decorating forums, follow us there.
There are many threads there that have some flooring ideas.
Yanita
The difference between success and failure is who gives up first!
Hey,
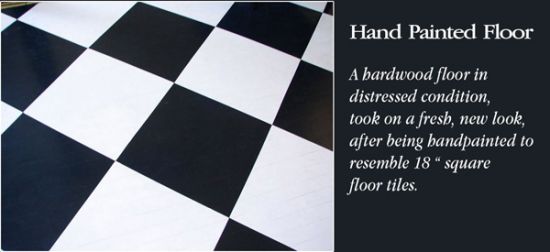
I had a checkered floor just like that in my other home, although I used Novalis peel and stick tiles.
At the moment we are considering the plywood squares for use in the master bedroom, thinking along the lines of using finish grade ply, and stain staining them, darker colors but one being slightly lighter than the other. I also was thinking that I wanted to set them in place using the harlequin design.
My dilemma is this is the first time I have owned a doublewide. Although I spent my second winter here I did not notice any movement in the marriage line, still wondering about doing this application.
Yanita
The difference between success and failure is who gives up first!
Quote: " I could paint it with some heavy duty oil base paint and do some sort of faux finish - even fake tiles.
Has anyone else tried this? Are there any special type of primers that I should use?
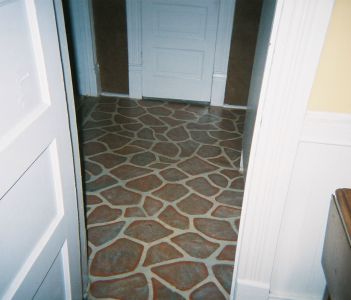
I have painted faux tiles on a kitchen backsplash, but not on the floor. I have painted faux cobble stone on a floor, but not in a bathroom. (Not much help, am I? )
)
I used water based primer, and craft paints, even on the floor, and 4-5 coats of non-yellowing poly. (floor)
Has anyone else tried this? Are there any special type of primers that I should use?
I have painted faux tiles on a kitchen backsplash, but not on the floor. I have painted faux cobble stone on a floor, but not in a bathroom. (Not much help, am I?
I used water based primer, and craft paints, even on the floor, and 4-5 coats of non-yellowing poly. (floor)
Wow Trudi - That's Bee-Yoo-Tee-Ful !
Looks like you really spent some time there. I think I am going to do the B-n-W checkers like the pic, maybe with a 1" black perimeter border. Just painted the Bathroom PURPLE - cause my wife said to - and it is fantastic looking. I also read that with th proper primer I can actually paint the laminate-plastic counter top.
So... I already painted the cabinet (previously pressboard with wood grain covering) in an off-white oil base finish. Looks great.
Walls, purple as mentioned.
Floor will be B-n-W squares
Countertop Black gloss
I will post pics after I am done. It actually ends up being fun being a cheapskate sometimes. I end up getting very creative and learn about things I never knew.
If all goes well, the kitchen floor will be next!
1989 Fuqua SW
Thanks, Mobtek. Just wanted you to see what plain ol' primer and craft paint would look like after years of wear, if sealing it well. The b&w will look very nice with the black countertop. Can't wait to see pics.
Be sure to include pics of the purple bathroom. I love PURPLE!!! I painted the inside of some built in shelves in my dining room purple. I'll see if I can post a pic.
You're right about learning a lot as you go, and this site is full of info. Can we see your cabinets too, when you post the pics?

Be sure to include pics of the purple bathroom. I love PURPLE!!! I painted the inside of some built in shelves in my dining room purple. I'll see if I can post a pic.
You're right about learning a lot as you go, and this site is full of info. Can we see your cabinets too, when you post the pics?
Will post pics! I have been careful to get step-by-step of the floor so far (I'm really bad about remembering these). Last night I floated out some uneven spots in the floor with Bondo. Seems to be working fine.
There was a guy down the street from my Dad who had a concrete driveway with a beautiful inlaid brick pattern. I admired it for years and even walked past it many times. One day I got up real close to inspect it. IT WAS PAINTED ON. Shadows and all. It was done so well that you could not tell it was fake until you were about 2 feet away. Even then it was very realistic.
There was a guy down the street from my Dad who had a concrete driveway with a beautiful inlaid brick pattern. I admired it for years and even walked past it many times. One day I got up real close to inspect it. IT WAS PAINTED ON. Shadows and all. It was done so well that you could not tell it was fake until you were about 2 feet away. Even then it was very realistic.
1989 Fuqua SW
Here is the BEFORE bathroom. Complete with carpet, wallpapered toilet and oh-so-elegant fake stained glass window! Also, the wood-grain-fake cabinet.

Here are the stripped / prepped / and Purple-painted walls. I have to admit I like it a lot.

Here is the cabinet painted in an off-white oil-based paint with new (cheap) hardware.

Here is the before of the floor:

Here is the Bondo work:

Here are the stripped / prepped / and Purple-painted walls. I have to admit I like it a lot.
Here is the cabinet painted in an off-white oil-based paint with new (cheap) hardware.
Here is the before of the floor:
Here is the Bondo work:
1989 Fuqua SW
Oh, that purple is gorgeous! Compliments to the wife for her choice.  And the white cabinet really looks good next to it. Keep the pics coming as you progress. I have a friend who painted his driveway in a faux brick. I saw the pictures and it did look nice. He said one of the colors lasted longer than the other though. Don't remember if it was the "grout" or the "brick" that lasted longer.
New pics -
Progress note - I could drive myself crazy if I tried to get the floor perfectly flat and smooth. I tried using some of the Floor leveling compound and was NOT happy with the results. I am much happier using Bondo - it is easier (for me) and can be sanded smooth very easily.
Because of imperfections in the floor I am considering a Black border with a Black sponge-on effect over the White. This should be better for hiding imperfections. I guess we'll see...
Here is the primer coat:

This is the first coat of off-White - same as cabinet.

Progress note - I could drive myself crazy if I tried to get the floor perfectly flat and smooth. I tried using some of the Floor leveling compound and was NOT happy with the results. I am much happier using Bondo - it is easier (for me) and can be sanded smooth very easily.
Because of imperfections in the floor I am considering a Black border with a Black sponge-on effect over the White. This should be better for hiding imperfections. I guess we'll see...
Here is the primer coat:
This is the first coat of off-White - same as cabinet.
1989 Fuqua SW
Mobtek, that's coming along. I've heard good things about Bondo, but haven't had occasion to work with it. Are you thinking of sponging the entire floor instead of the b&w squares, or am I confused? If you do decide on painting tiles, what size would they be in that space? You could do both the "tiles" and the sponging, by taping off your squares, sponging on the black, maybe even a hint of a 3rd color, then removing your tape, exposing your "grout." Voila' there's your tiles, just not in solid colors. Either will be nice. Don't mind me; I tend to get all wrapped up in a project even if it isn't mine. 
I've heard good things about Bondo, but haven't had occasion to work with it.
Bondo is fantastic. I have been using it to repair wood for years. It is two-part and dries very quickly (sandable in no more than 20-30 minutes). They have it at Walmart in the auto section by the paint.
Are you thinking of sponging the entire floor instead of the b&w squares?
I may be sponging the entire floor. Because of the wood grain I might not be able to lay down masking tape tight enough to paint the squares (paint might leak under the tape). Plus the sponge-on effect would probably hide the MANY imperfections. I'm WAY too lazy to take the many hours extra to float out the floor to make it completely smooth.
When I do the perimeter border in Black I will see how much bleeds under the tape. If my lines are crisp, then I will attempt the squares. I also have an idea for a different pattern. Who knows - I could change my mind a few times before that second coat of White dries!
1989 Fuqua SW
I know what you mean about changing your mind. I remembered seeing/hearing something that can be used to prevent seepage of paint underneath the tape, so I searched on the HGTV message board, and copied these excerpts of posts there, just for info purposes. They are as follows:
1: Look into Frog Tape instead of blue tape. It has something in the adhesive that seals when latex hits it, so less bleeding than with the blue tape. The tape is expensive. I think he said about 12.00 per roll.
2: Candace did this on a Divine Design I caught the other day. She put the blue tape down, then painted the original wall color along the tape to seal it. Then the stripe color. When she pulled off the tape, the line was perfectly straight. (For painting stripes on a wall)
3: you can use the base color on your taped out stipe edge. You would paint ONLY a sliver of the base color down EACH stipe edge . This will seal down your tape and if any bleed through did occur, (WHICH IT SHOULDN'T --- if you use scotch 3m- orange core # 2080 blue delicate painter's tape.), the base color will stop any seepage.
4:Another thing you can use on your taped out edges to prevent bleed through is to use a low matte sealer on ehte tape edges,
After you put on the tape run some caulk down it and it will seal all the gaps.
Thanks for the info Trudi. I'm afraid that $12 tape would not be cost effective. I am determined to keep this project inexpensive. Since I used oil based paint, I can't really use paint to make the tape adhere or I'd be scraping and starting over. I will just have to "deal with it".
Too bad I can't do anything for about five days - leaving town for a while. At least the base coat is on and will be good and dry when I start the decorative coat.
Too bad I can't do anything for about five days - leaving town for a while. At least the base coat is on and will be good and dry when I start the decorative coat.
1989 Fuqua SW
-
- Similar Topics
- Replies
- Views
- Last post
-
-
Porch roof - can I put plywood on it to support me?
by WholeHouseFan&Solar » Fri Sep 28, 2018 10:48 am » in Mobile Home Repair - 1 Replies
- 22815 Views
-
Last post by Greg
Fri Sep 28, 2018 8:14 pm
-
-
-
Skirting: Are automatic vents a good idea?
by mdnagel » Tue Jun 18, 2019 3:13 am » in Mobile Home Repair - 4 Replies
- 15616 Views
-
Last post by mdnagel
Fri Jun 21, 2019 5:30 am
-
-
- 3 Replies
- 8782 Views
-
Last post by Greg
Thu Dec 13, 2018 7:06 pm
-
- 2 Replies
- 26091 Views
-
Last post by Greg
Thu Oct 24, 2019 6:50 pm
-
- 2 Replies
- 50685 Views
-
Last post by Mark440
Thu Apr 11, 2019 11:15 am