Ceiling with rosettes question
Moderators: Greg, Mark, mhrAJ333, JD
-
tiggereverett
- Posts: 9
- Joined: Wed Feb 06, 2008 10:56 am
- Location: Hanford,CA
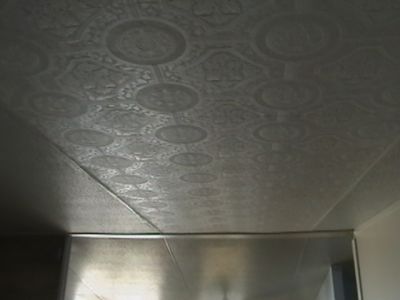
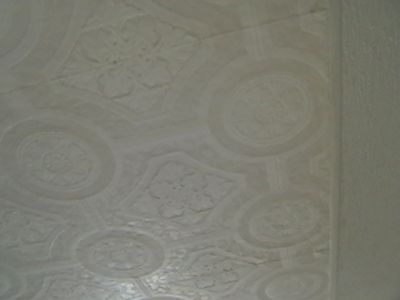
Good Morning everyone! I recently purchased a single wide MH. It was built in 1986. The ceiling throughout r filled with strip and rosettes with screws. The strips don't bother me as much as the rosettes. Is there a way to cover up the rosettes without installing a new ceiling. I've seen various ideas online so just trying to find out the easiest and best way to do this.http://viewmorepics.myspace.com/index.c ... D=20751887[/url]

Hi & welcome to the family. If you have the "fiber" type panels it is very tough to get away from using some type of "washer" to keep the head of the screw frompulling through. If you have sheetrock you can usually get away with just the screw.
Others may have some ideas for you. Greg
Others may have some ideas for you. Greg
"If I can't fix it, I can screw it up so bad no one else can either."
-
tiggereverett
- Posts: 9
- Joined: Wed Feb 06, 2008 10:56 am
- Location: Hanford,CA
Thanks Greg, not sure yet what type I have....I'm hoping to somehow cover up the rosettes or the screw

Hey there Central Valley Person!
If you have both strips and rosettes, I would bet that some of the ceiling has been replaced at some time. I have never seen a factory mix the two. Also, after all the Mannington mobile home ceiling panels were used up, Okaply from Canada started selling their ceiling panels. They sell panels called Modulux, which can be purchased in plain 4x12 (or 14) panels or with the grooves 16" o.c. to use with a strip (spline) fastening system. Using the plain panels with rosettes would be much cheaper for the installation. Anyways, something like that could have happened.
To change the rosette look, you could replace the rosettes with a flat piece of 1 1/2" wood trim. I'd use a countersink bit to pre-drill the trim and bury the screw and then just spackle over the screw. You would want either pretty thick softwood or more expensive but thinner hardwood. I would also use plenty of screws, like every 12". You could use brads to hold down in bowing of the trim between screws. It also helps not to over torque the screws.
Just an idea,
JD
Fresno
☯JD♫
Today is PERFECT!
All information and advice given is for entertainment and informational purposes only. The person doing the work is solely responsible to insure that their work complies with their local building code and OSHA safety regulations.
Today is PERFECT!
All information and advice given is for entertainment and informational purposes only. The person doing the work is solely responsible to insure that their work complies with their local building code and OSHA safety regulations.

Hi,
My ceiling is also the rosettes and splines. I believe all are original to the home, we have a 35 yo Mansfield.
After we did a major renovation to the master suite area we needed to do "something" to repair the ceiling from the removal of walls.
I like the country cottage style of home decor so our solution was to take 2x4 and cut them into 2x2's. We predrilled every foot and then installed where the rosettes used to be. LOL, still need to fill the holes, prime and paint. It gives the appearance of having a second story with the floor joist exposed below.
A totally different look would be to stain these, and then add some nice trim/crown.
Yanita
The difference between success and failure is who gives up first!

-
tiggereverett
- Posts: 9
- Joined: Wed Feb 06, 2008 10:56 am
- Location: Hanford,CA
Was also wondering if vinyl wall coverings would work on the ceiling or would the rosettes poke through?
-
Koiflowers
- Posts: 80
- Joined: Sun Jan 20, 2008 12:01 am
Tigger:
I've tried the Architectural wallpaper on my ceiling. You probably know that Anaglypta and Architectural are paintable wall papers specifically made to bridge imperfections, up to 1/4 inch cracks (such as paneling) and even cinder block walls. If you could replace the rosettes with flat washers and flathead screws you might be home free.
I got part of it up on the ceiling, but because of the bumpy texture of the ceiling board it was a two-man job. I'm using a sturdy clear wall paper adhesive, but the weight of the paper and those darned textured bumps make it challenging.
I bought plastic push pins at Wall-Mart to help hold it up while I smoothed it out. But the pins didn't work well. The extra set of hands are what I needed.
Because of the difficulty working overhead I am running it between the seams in 4 foot sections. Working left to right. Rather than in long 13 foot strips. It makes it look like 2' x 4' tin ceiling tiles. I love it so much. If only I could pin hubby down for some more extra hands.
Last edited by Koiflowers on Fri Feb 08, 2008 3:52 pm, edited 2 times in total.
-
tiggereverett
- Posts: 9
- Joined: Wed Feb 06, 2008 10:56 am
- Location: Hanford,CA
You are awesome! Thanks so much
-
Koiflowers
- Posts: 80
- Joined: Sun Jan 20, 2008 12:01 am
If you ask my husband he will say I am the bane of his existence. Or that he's glad he not blind, because our house changes every day. He also jokes that his middle name is "manual labor."
Please do not underestimate how frustrating it is to wallpaper overhead, especially if the ceiling has those pointy little orange peel bumps. You will need extra hands.
If you go to Lowe's and get the pre-pasted paper (only $12 a double roll) still use heavy duty ultra-clear wallpaper adhesive.
I tried dipping in water, and the paper becomes stretchy, and transparent, and infinitely harder to work with.
Post pictures when you're through.
-
tiggereverett
- Posts: 9
- Joined: Wed Feb 06, 2008 10:56 am
- Location: Hanford,CA
I definately will post some pics. I'm going to do the bathroom ceiling as the test ceiling before I tackle the big living room/kitchen ceiling. This has made my day! Thanks
-
tiggereverett
- Posts: 9
- Joined: Wed Feb 06, 2008 10:56 am
- Location: Hanford,CA
What's the best way to put up the vinyl wallcovering? The instructions say to dip it in water but if I have wallpaper adhesive can I keep the wallcovering dry and just hang it up using the wallpaper adhesive?
-
- Similar Topics
- Replies
- Views
- Last post
-
-
88 Doublewide Cathedral Ceiling Ventilation Question
by Starnesz » Thu Feb 07, 2019 11:07 am » in Mobile Home Repair - 3 Replies
- 28518 Views
-
Last post by Greg
Fri Feb 08, 2019 7:48 pm
-
-
- 2 Replies
- 1350 Views
-
Last post by samkind100
Wed Jun 26, 2019 4:22 pm
-
- 3 Replies
- 7842 Views
-
Last post by LabFolk
Thu May 18, 2017 10:18 am
-
-
Ceiling planks over existing panels?
by simpleword » Wed May 31, 2017 1:41 pm » in Mobile Home Repair - 1 Replies
- 26532 Views
-
Last post by Greg
Wed May 31, 2017 7:19 pm
-
-
- 1 Replies
- 10018 Views
-
Last post by Greg
Sun Jun 04, 2017 1:01 pm