Do-It-Yourself Concrete Pad

Repair help for the do-it-yourselfer.
For mobile home parts, click here.

Moderators: Greg, Mark, mhrAJ333, JD

User avatar
Mark
Site Admin
Posts: 742
Joined: Sat Feb 17, 2007 4:23 pm
Location: Aberdeen, SD
Contact:

Hi,

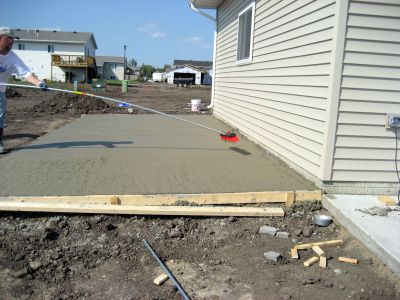
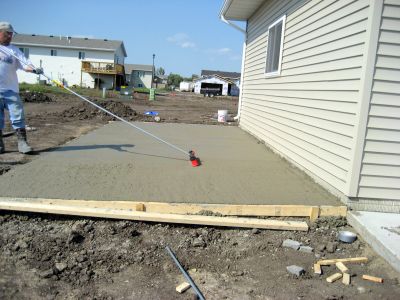
This week I've had the 'fun' of installing a cement parking pad next to a garage. I'm not a great concrete finisher, so anyone who asks me to help will get less than perfect results. Finishing concrete is an art, but if your willing to accept a less than perfect job, then 'maybe' you might try pouring your own.

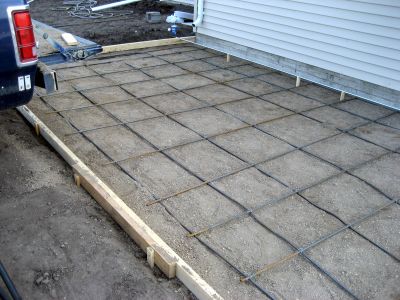
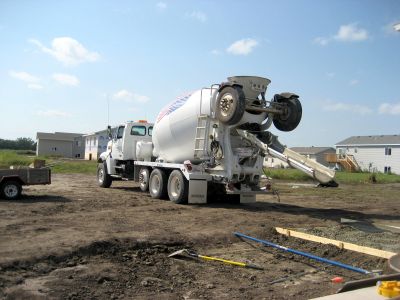
The pad I poured was 11 x 24. Plenty big for someone like me who doesn't have a lot of concrete experience. The concrete guys around here charge and arm & a leg, and are all busy. But now that I've finished pouring the pad, I do have to say that I have a respect for them as it would have taken a good crew a long afternoon to do the job. It took me several days (not working full days tho).

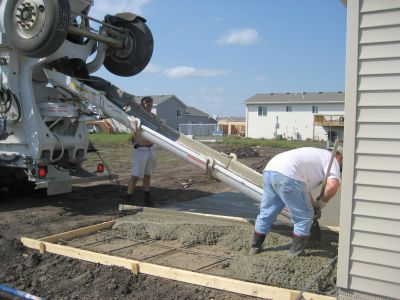
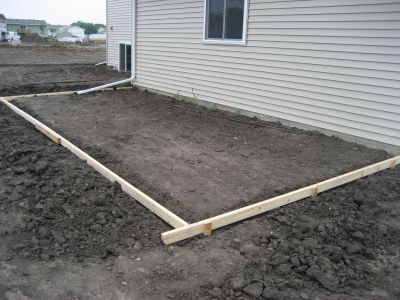
Outlined are steps and pictures of how I poured the pad. Like skinning a cat, there's more than one way.

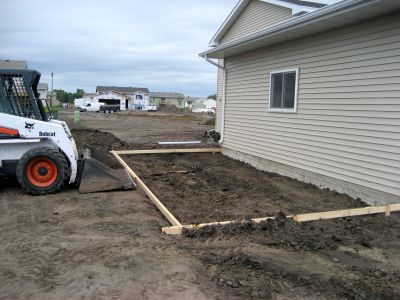
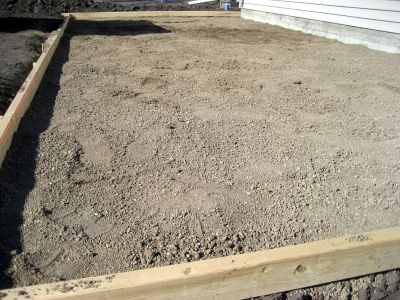
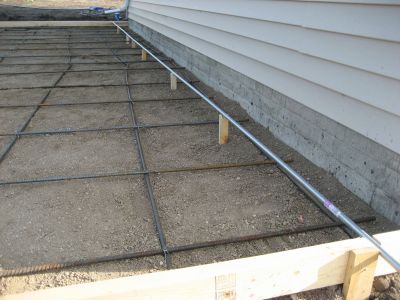
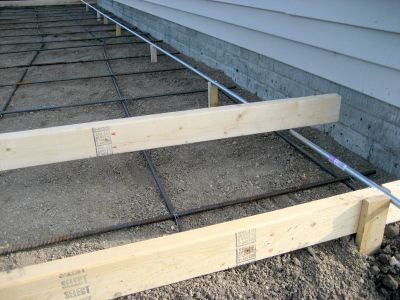
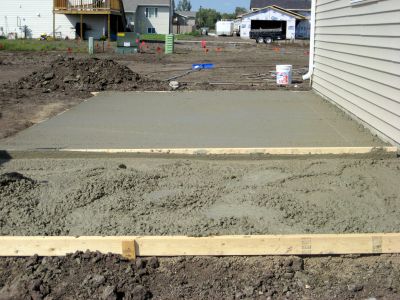
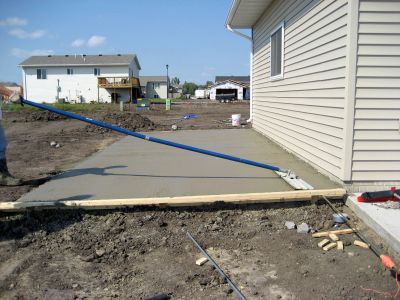
This pad needed to be level with the surrounding landscaping (ie not sticking up 4 inches for a mowing headache). First thing I did was create a form out of 2x4 boards. In our area, code says that a 4" pad is acceptable. In your area it might need to be 6". Check your codes! I then dug-in the form so it was level with the landscaping, yet sloped away from the garage.

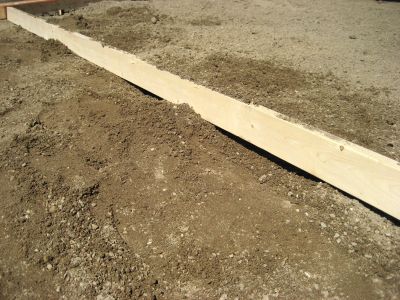
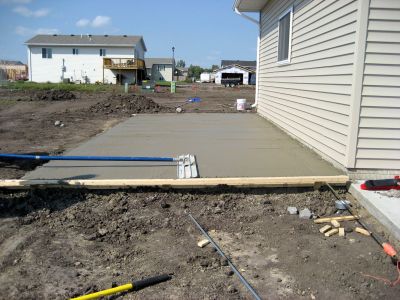
Next be sure your form is square. Do this by running a tape measure from bottom left corner to the upper right corner. This measurement should be the same as measurement from the bottom right corner to the upper left corner. If not, adjust your framework. Pound your stakes so they are flush with the top of the framework (prevents the screet board from catching on them). Then screw the stakes to the framework. I always screw out so the screws do not protrude into the cement (making removal later much harder).

Image

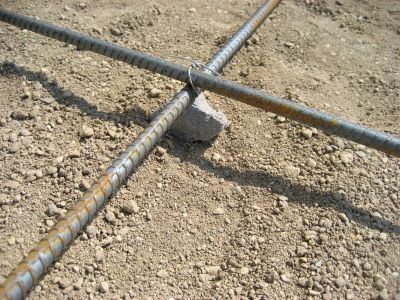
Since we wanted the parking pad to be level with the landscaping, we then needed to remove about 7" of dirt from the middle of the framework. The soil was hard -- really hard. Digging it by hand would have taken a week! So a skidsteer was rented. I removed one board of the form, and dug-out the inside using the skidsteer. A real life saver for this job.

Image

Image
Last edited by Mark on Fri Aug 31, 2007 1:39 am, edited 3 times in total.
You can't fail if you don't try!
User avatar
Mark
Site Admin
Posts: 742
Joined: Sat Feb 17, 2007 4:23 pm
Location: Aberdeen, SD
Contact:

Next is to add a base for the concrete. The base allows water to drain away from the concrete. Sand makes a good base, but its expensive. I used a crushed gravel, which is almost just like sand, but less expensive. Around here I paid $15/ton, and this project required just over 4 ton for a base of 3-4".

Image

Next, the base (crushed gravel) needs to be leveled and compacted. I used a 2x4 as a guide. Add your base, then level by dragging the 2x4 across the bottom. Be sure the top of the 2x4 is level with your framework.

In the picture below, you can see that more base needs to be added to bring the level up to the bottom of the 2x4. If you skimp on your base, you may need more concrete to do the job (or worse yet, not have enough when the truck arrives!). Crushed gravel is cheaper than concrete! Be sure to compact the base by tamping it. If your doing a large area, you can rent a compactor.

Image

Image
You can't fail if you don't try!
User avatar
Mark
Site Admin
Posts: 742
Joined: Sat Feb 17, 2007 4:23 pm
Location: Aberdeen, SD
Contact:

I may be a little old fashion, but I still think nothing strengthens concrete like rebar. Unfortunately with the price of metal these days, rebar is a bit expensive. Another option is to get fibers mixed with your concrete.

Lay down the rebar in 2x2 squares. Tie everything together using wire. Rebar generally comes in 10' & 20' sections. I bought some sticks in 20' sections, and then bent them to get them in my pickup. Most things I learn the hard way, and I'll never do that again, as it's about impossible to make the rebar straight again.

Image

Next step I did was install a screet bar near the wall of the garage. The bar is set level with the top of the forms. Pull a masons strings across so you can get it set level. I notched the top of each stake and pounded them in every few feet. The notch needs to be below the top of the bar. It sounds harder than it is to do. Also be sure to put a notch in your framework so the bar doesn't stick above it.

For a bar, I used conduit. An 8-foot length of 1/2" conduit costs about $3/stick. However, conduit could bend easily, so I strengthened it by running a piece of rebar inside of it. Perfect!

Image


This picture below shows an example of my screet board. The end you don't see rests on the outside board of the framework. The end you do see rests on the screet board. When you pour cement, you move this board back and forth to level the cement with the top of the form.

Image

Finally, you need to raise the rebar up off the ground. You can buy special legs that do this. I tend to use small rocks or chunks of concrete. Of course you can also pull-up the rebar as your pouring cement, but I prefer to have it already off the ground when I start pouring. Also, after your done tieing the rebar together, be sure the ends of the wires point down.

Image
You can't fail if you don't try!
User avatar
Mark
Site Admin
Posts: 742
Joined: Sat Feb 17, 2007 4:23 pm
Location: Aberdeen, SD
Contact:

I should also note that if your pouring concrete in a building, you will need to put down a plastic covering on top of the base, yet underneath the concrete. Check your local codes to see if you need plastic, and if so how thick the plastic needs to be. For this project plastic was not required.

Now you are ready to order concrete. Best way to figure it up is to call your concrete company with the dimensions of your project. They'll tell you in a jiffee as to how many yards of concrete you need.

Otherwise you can figure it up the yards yourself by using the following formula in feet. (length x width x depth) divided by 27. In my case, it was 24 feet x 11 feet x .33 feet deep. 24x11x.33 = 87.12. 87.12 divided by 27 = 3.22 yards. I ordered 3.5 yards of cement. I also ordered a strength of 4500 psi. For a parking pad, you may be able to get by with 4500 psi. Your concrete company can help you determine what's right for your project. Today's price for concrete was $89/yard delivered.

However, if you have dips & valleys in your base gravel, you better order 3.75 or 4 yards. In case there's extra cement, I always have a use for it somewhere. Today I had another small pad set-up for a basketball hoop.

By the way, if some of you are convinced that you can save money by mixing the concrete yourself -- your nuts. Maybe doing the basketball hoop pad you'll be fine -- but for anything over a yard, order it by truck. One reason is that it's about impossible to mix concrete fast enough for anything over a yard without running into drying and finishing problems.

There's a few other things you need to have ready before the concrete truck arrives. Have a hose with a sprayer handy. Have a couple 5-gallon buckets of water. Have mud boots available. Gloves too. Rent a concrete bull float with a handle long enough to reach across your pad. Also have a broom available with a long handle for final finishing. You'll also need a concrete edger and a trowel. Also shovels & a screet board. I used a 12' screet board for my 11' wide pad. And finally, find a couple of helping hands.

OK, we're ready, call the cement truck.

Image
Last edited by Mark on Fri Aug 31, 2007 1:30 am, edited 3 times in total.
You can't fail if you don't try!
User avatar
Mark
Site Admin
Posts: 742
Joined: Sat Feb 17, 2007 4:23 pm
Location: Aberdeen, SD
Contact:

When the concrete truck arrives, many companies give you a half hour to have it unloaded without being charged extra. So you need to be ready! And don't expect the driver to be much help. His job is to move the truck backward and forwards, and to run the concrete down the chute.

Pouring concrete works best with 3 people. Two to scoop & one to control the chute & tell the driver when to move. Start pouring at one end of the pad. Stop every so often and screet the concrete level with your framework using your screet board. You may have to screet twice. As you screet, fill in any voids. IMPORTANT: As you pour, jab your shovel in and out of the concrete along the entire edge of your framework. This helps make for a smooth edge when you remove the framework later.

Then pour the next section and screet some more. Hopefully you reach the end of your pour without running out of concrete.

In the picture below, you can see that we are pouring the last section of the pad. Notice that we have screeted the concrete up to the last section. Yes, the driver will give you time to stop and screet. Don't pile up too much concrete, as screeting becomes a lot harder. For this job, it took us about 25 minutes to pour and screet.

Image

The picture below shows the screet board.

Image
Last edited by Mark on Fri Aug 31, 2007 1:17 am, edited 2 times in total.
You can't fail if you don't try!
User avatar
Mark
Site Admin
Posts: 742
Joined: Sat Feb 17, 2007 4:23 pm
Location: Aberdeen, SD
Contact:

The concrete has now been poured and screeted. You are now moving on to the finishing phase. This is the phase that makes most do-it-yourselfers nervous. If you've never finished concrete, you definitely want to practice on a couple small 3x3 or 4x4 pads before doing a large project.

Since I'm also not a great concrete finisher, I too get nervous. In fact, I tend to start the finishing project too early. The concrete needs to start setting up before you can do the finishing. Of course, on a hot windy day, it can set-up mighty fast. On normal days, you maybe have 30-45 minutes before you should start the finishing process.

For a parking pad, start the process using a bull float. Push the bull float across the pad with the far edge slightly up. When you reach the other side, lift up on the handle and pull back towards you. Always push or pull with the leading edge up.

The picture below shows me pushing the bull float towards the garage. Notice how the leading edge is slightly up.

Image

This next picture (below) shows me pulling the bull float back towards me. Notice that the handle is up, and the edge coming towards me is up.

Image

I pull the float back and forth over the whole pad several times. Any low spots should be filled in with a splash of concrete and worked smooth with the bull float. As you work the float, water will come up to the surface. This is fine, but you don't want too much water or you risk other problems (like the top flaking off later).

If you are finding that the concrete is drying before you are done smoothing, then spray a mist of water on it using your hose.

Like I said earlier, finishing concrete is an art. If you want to learn more about it, there's plenty of books out there.
You can't fail if you don't try!
User avatar
Mark
Site Admin
Posts: 742
Joined: Sat Feb 17, 2007 4:23 pm
Location: Aberdeen, SD
Contact:

Once the concrete is smooth and there's no rocks sticking up, your ready for the final finishing step. Using a medium-stiff broom with a long handle, lift and set it at the far side of the pad as pictured below.

Image

Then evenly pull the broom towards you. You only want to do this once, then move to the next section.

Image

Like I've said several times, I'm not a great finisher. The first time I finished this pad, I did it too early. When I broomed, it brought rocks up. So I waited another 30 minutes, sprayed a fine mist of water over the pad, and finished it again -- first the bull float, then the broom. Still not perfect, but way better the second time!
You can't fail if you don't try!
User avatar
Mark
Site Admin
Posts: 742
Joined: Sat Feb 17, 2007 4:23 pm
Location: Aberdeen, SD
Contact:

Next I went around the edge of the pad using a cement edger. This basically rounds the corner of the cement.

Image

The final step was to finish the edge up against the garage. To do this, I waited until you could almost walk on the concrete. Then I layed down some scraps of plywood and walked crawled on those. Using my edger and some water, I was able to work that edge. Not perfect, but good enough for a do-it-yourselfer.

In the picture below, you'll notice a few chunks on the pad. Those are from working the concrete up by the garage wall. They will sweep right off once the pad finishes drying.

Image

When working with concrete, always rinse-off your tools as soon as you are done using them. This makes clean-up a snap, and the rental companies want tools returned clean or you could get charged a clean-up fee.

The next day you can remove the wood framework from your pad.

Have fun!
Mark
You can't fail if you don't try!
User avatar
JD
Site Admin
Posts: 2696
Joined: Sun Feb 25, 2007 11:57 pm
Location: Fresno, CA
Contact:

Hey Mark,

Fun stuff, eh? I built pole barns about 30 years ago. We would flat pour the concrete into the building after it was built. I would chalk line the grade onto the 2x6 T&G and drive stakes down to grade about 9' O.C. through the field. I'd stick one end of the screet board on the stake and screet visually off of the grade line on the 2x6. Working kind of circular that way. But we are forgetting the fun part! Running the jitterbug. I never rented a vibrator. We would use that metal contraption that you lift up and down real fast pounding the aggregate (gravel in the concrete) down. That was probably the toughest part of the job for me. We'd bull float and then hand trowel finish, usually. We did a couple of exposed aggregate finishes, which was way cool looking and easy. We did some broom finishes. But mostly the people wanted the smooth finish. That is a back breaker too. Most buildings were 24x36 and bigger. We just nailed 2x2 onto plywood for kneeboards and work to the door. I would have 4 guys, two of which would finish.

I did this work up in North Washington State. In cold weather we would run 1.5 to 2% calcium in the mix so it would set up in colder weather. This would make the concrete so hot it felt like your feet were burning up in your boots. I found out later that the calcium was not good for the rebar but it was alowed when I used it. I don't know if my mix was right or wrong, that is just how I was taught to do it. Never had a problem with building inspections or complaints from my customers, that I knew of.

Man, those were the days! I was young and strong then. My crew and I would walk onto a graded site and start digging holes for poles. 4-5 days later we left a 2 car garage with shop, complete with the concrete floor. We'd install two 9x7 garage doors, maybe a big slider for an RV, a regular door and usually wall skylights. There were also more extravagant barns. Built a few horse barns, and some that had some with regular interior office rooms. I worked with several other crews on a mini-mall once. The strangest barn I ever built was a 36x36x16' (eave wall) aviary. This thing had a couple of interior office rooms and a whole bunch of regular doors, 10 if I remember right. 2 on each side and one for each office. It just looked funny like a huge box. Walking the purlins was exciting too. With the 4/12 pitch and 16' side walls, it was pretty tall.

Anyways, pad looks great! I know it was a lot of work.

JD
☯JD♫
Today is PERFECT!

All information and advice given is for entertainment and informational purposes only. The person doing the work is solely responsible to insure that their work complies with their local building code and OSHA safety regulations.
altasnowman
Posts: 98
Joined: Tue Jun 05, 2007 7:58 pm
Location: Edmonton,AB Canada

Hi Mark,
Dumb Question Did you have the parks permission ROFLMAO. Looks good, want to come and do one for me? just kidding. Anytowhom all that looks like you have left to do is remove frame and redo landscaping. Will be thinking about you this long weekend. Have fun
The dirtyist word in the dictionary CANCER....it takes many too soon and leaves nothing but anger and pain. We all mourn the loss of those that have succummed to this......
User avatar
Maureen
Moderator
Posts: 489
Joined: Sat Feb 17, 2007 10:35 pm
Location: Sun Valley, Nevada

Excellent job Mark!

Both my dad and uncle were DIY pros in concrete, brick and rock work. I spent many days learning from them! Between the 2 of them, I have a good 50 years of being a grunt to them lol! Helped my dad until he passed away and I've been right there for my Uncle since. I have yet to do any concrete work here, but it's on the do to list! I want a real side walk around the front of the home and I want the asphalt removed and a parking pad installed out back. Asphalt is a pain to maintain with our temps here. It's like glue in the Summer and cracks in the Winter.

I agree, if you're in an area that experiences freezes, you have to install rebar! So sad that it's expensive these days. But, if your going to do it, do it right! It's no fun being on the business end of a jack hammer to rip it out!

It's like everything else we preach here, the out come of a project depends on the correct steps to achieve the finished product. Skip a step or two, and you're looking at trouble down the road. That's fine if it's a paint job, but a major project takes doing the job correctly!

If you're going to do a job folks, do it right! Mark hasn't missed a step in the project. Cutting corners will come back to haunt you later!

Maureen 8)
Never discourage anyone...who continually makes progress, no matter how slow.
'Plato'
User avatar
Harry
Posts: 1249
Joined: Mon Feb 26, 2007 7:45 pm
Location: Citrus county Florida

Hi Mark

Nice job and instructions with photos.

Harry
Aside from the roof leak, soft floors, rats, mice and bursted plumbing ........ how do you like it?
User avatar
Mark
Site Admin
Posts: 742
Joined: Sat Feb 17, 2007 4:23 pm
Location: Aberdeen, SD
Contact:

As I've mentioned before, I'm the king of learning how to do things the hard way. That's one reason why I created this website years ago -- hoping the info posted here helps others so you don't have to learn it all the hard way.

Anyway, I'm not impressed with the finish job on the concrete pad I just poured. However, I did find a solution to fix some minor flaws in the pad. Basically I used a big file!

Image

You want a file that's big enough to put one or both hands on. Then grab a pair of knee pads and start filing. The file won't solve any big oops', but it did take out some of the minor flaws. Oh, I used the file just before the concrete turned white (when it's not so hard). After it dries and turns white, even a file might not work.

I guarantee you that the next pad I pour (coming up Tuesday), will have a much better finish job.

Mark
You can't fail if you don't try!
User avatar
JD
Site Admin
Posts: 2696
Joined: Sun Feb 25, 2007 11:57 pm
Location: Fresno, CA
Contact:

Mark,

I think you would get a much better finish if you used a jitterbug or a vibrator before the bull float. You might want to look at this.

http://www.tpub.com/content/constructio ... 43_198.htm

When doing the search for this image, I saw a lot of links to sites with the same document about not using a Jitterbug or vibrator. I don't know anything about this. I know you don't want to overwork the jitterbug. Not only will it wreck your back, it could bring up too much water from the mix. Basically, one 6" drop and then overlapped by half was good. Just lift-drop-lift-drop-lift-drop for what seems an eternity. I also worked as a laborer in a large concrete company doing condos for a short while when I was a kid. They used the vibrator device. Very cool tool.

Again, I am no pro concrete guy. But I did do many thousands of SF this way. It pushes down the aggregate and makes finishing much easier, especially with the broom finish. The broom will tend to flip up aggregate that is close to the surface.

Hope this is right, hope this helps.

JD
☯JD♫
Today is PERFECT!

All information and advice given is for entertainment and informational purposes only. The person doing the work is solely responsible to insure that their work complies with their local building code and OSHA safety regulations.
User avatar
Mark
Site Admin
Posts: 742
Joined: Sat Feb 17, 2007 4:23 pm
Location: Aberdeen, SD
Contact:

The pad I'm pouring Tuesday is a bit smaller. Perhaps I can achieve a similiar affect by vibrating with a shovel before screeting. I do this to the sides, and my sides turned out almost perfect.

When the pros screet, they use a big wide machine that must screet and vibrate at the same time. Otherwise I never see them around here using a viabrator much.

Appreciate the tips.

Mark
You can't fail if you don't try!
Locked
  • Similar Topics
    Replies
    Views
    Last post