The 6261840 fan switch is most often found in the Mac 1199 series furnaces. The switch is no longer available. If your switch is not working properly, you will need to replace it with this conversion kit.
TROUBLESHOOTING
Upon the call for heat, the 626184 fan switch is designed to close two circuits when the temperature inside the furnace reaches 120-125 degrees farenheit. The switch closes a 24V circuit which then closes the 110V circuit and turns on the blower. When the call for heat is satisfied and the furnace cools below 120F, the switch will open shutting off the blower. If your blower constantly runs or does not run, the problem may be this fan switch sticking.
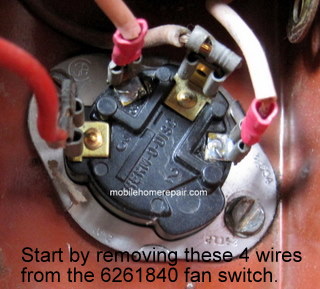
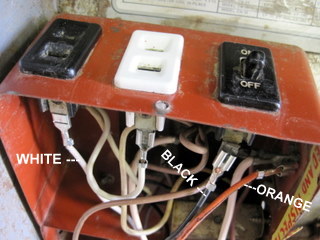
Pictured to the right is an original 6261840 switch installed in a Mac 1199 furnace. 4 wires connect to the switch. The two wires with the small ends are 24V. The 2 wires with the larger ends are 110V. Color of the wires may not always agree with your wiring diagram, so be sure to note the different sizes of ends.
PARTS
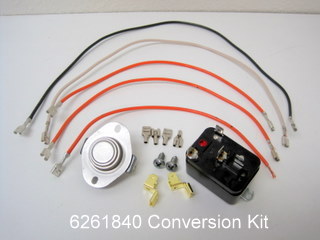
Pictured to the right are the parts of your 6261840 conversion kit. Be sure you have all the parts. Parts included are:
1 – black 14 gauge stranded high-heat 18″ wire with female ends.
1 – white 14 gauge stranded high-heat 18″ wire with female ends.
2 – orange 16 gauge stranded high-heat 12″ wire with female ends.
1 – orange 16 gauge stranded high-heat 12″ wire with 1 female & 1 stripped end.
1 – 24V coil relay L36-904.
1 – F110-20 fan switch size 60T11 (stock).
2 – Self-tapping sheet metal screws size 8-18 x 1/2.
2 – Terminal chair connectors (G21-414).
2 – Piggy-back connectors (61944-2).
4 – Extra female ends (G22-633).
INSTALLATION
1. Shut off power to furnace. Remove furnace door and remove cover of electrical box found inside furnace.
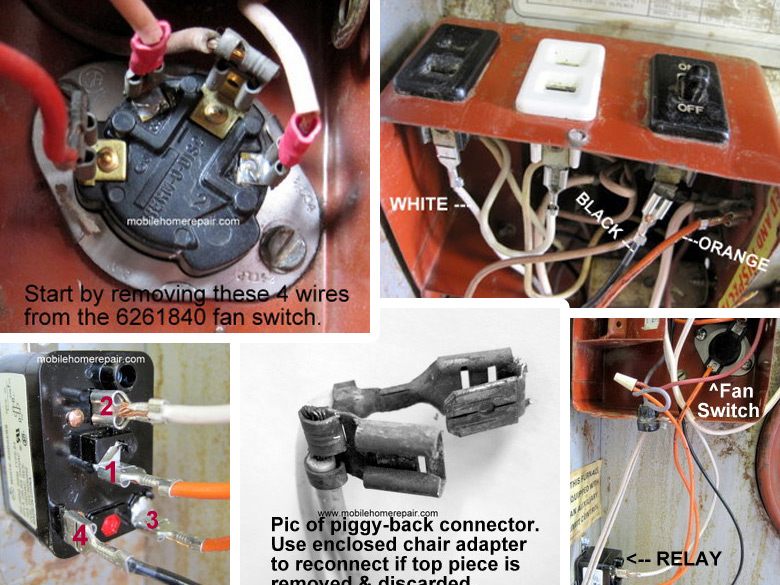
2. Remove the 4 wires from fan switch.
3. Remove fan switch by removing the 2 screws holding fan switch to furnace wall.
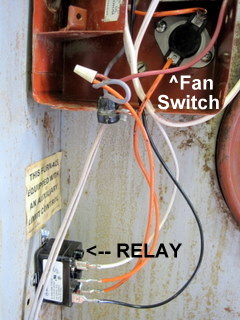
4. Attach black 4-prong relay to sidewall of furnace using the self-tapping screws. Drilling a small hole will help ease the screws into place. Attach the relay 2″-3″ underneath the electrical box in the furnace (see picture).
5. Screw the new fan switch into the same location as the old switch.
WIRING
Remember, the wires to be removed and discarded may be a different color. If you have been following these instructions step by step, all the wires to be removed will have one end that is not connected to anything.
1. Remove and discard the 110V white wire from black receptacle and replace with white wire from kit. Connect one end to the receptacle, the other end to terminal 2 on the black relay.
2. Remove and discard the 110V black wire from black toggle switch and replace with black wire from kit. You may need to use one of the enclosed chair adapters to reconnect to toggle switch. 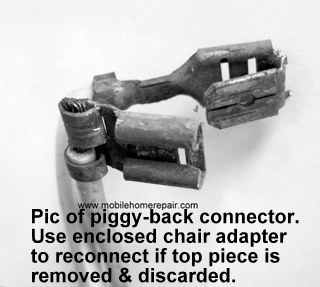 Connect one end to the toggle switch, the other end to terminal 4 on the black relay.3. Remove and discard the 24V orange wire from the terminal board located on the side of the electrical box. Replace with an orange wire with 2 ends from the kit. Connect one end to the terminal board, the other end to the top terminal of the fan switch.
4. Remove and discard the second 24V orange wire from the wire-nut. Replace with an orange wire which has 1 stripped end. Connect the stripped end to the wire nut, and the female end to terminal 3 on the relay.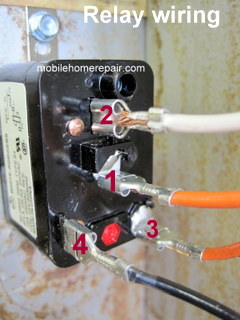
5. Find the orange wire with the 2 female ends. This also 24V and should be the last wire in the kit. Connect one end to the bottom terminal of the fan switch. Connect the other end to terminal 1 on the black relay.

6. Put cover back on electrical panel. Put door back on furnace. Turn power back on and run furnace.
We’ll do our best to offer you good advice, but we take no responsibility or liability if things don’t go right. The best way to repair your furnace is to call a qualified technician.