Rafter repair

Repair help for the do-it-yourselfer.
For mobile home parts, click here.

Moderators: Greg, Mark, mhrAJ333, JD

Locked
sndmn2
Posts: 11
Joined: Mon Apr 02, 2012 1:26 pm

I have an older home that is roughly a 1970 12x70. I've owned it since "88". I use it as my get away. Anyways, we had a really heavy snow about 4 weeks ago that callapsed a portion of the roof. I probably have 5-6 broken trusses. There is a section where it was sagged roughly 9 inches. I have two post jacks supporting it right now. I have raised it about 4inches. Can I assume that it is somewhat safe to run these post jacks up flush to level the ceiling and begin to repair the trusses? These are enginnered trusses with metal support clips. Once pushed into place my thought was to glue/bolt and sister new 1/2 in. plywood to the center support that runs through the trusses. Then repair trusses as needed. I was thinking to use 1/4 luan glued and nailed with a trim nailer. The sound of the metal roof as it popps back into place sorta gives me the woolies. Thanks for any tips and your thoughts.
Rick
Image
Image
User avatar
JD
Site Admin
Posts: 2696
Joined: Sun Feb 25, 2007 11:57 pm
Location: Fresno, CA
Contact:

Only the person who is there doing the work could have a good idea of how "safe" it is, but that is the plan of attack that I would have. I jack the trusses up individually, running the support beam under the length of the truss being repaired and usually over correct the trusses by 3/8" or so, to allow for settling after releasing the jacks. You may need to be creative while trying to support multiple trusses as you show in the picture.
☯JD♫
Today is PERFECT!

All information and advice given is for entertainment and informational purposes only. The person doing the work is solely responsible to insure that their work complies with their local building code and OSHA safety regulations.
User avatar
flcruising
Posts: 606
Joined: Mon Dec 03, 2007 2:18 pm
Location: Florida Panhandle

It appears to me that you have horizontal purlins over the trusses that the metal roof is attached to without a roof deck. Is that right?

Since both the top and bottom truss cords have been compromised, I suggest against running the jack posts up to press them flush again. More damage will probably ensue. If you could get some temporary supports up to the purlins and shore them up to remove the bearing weight off the trusses, you would have a safer work environment to do the necessary repairs. I would also only move things back into place from below while another person is watching the roof from above to make sure all is well.

It looks like building new trusses will be in order and not repairing what is there. I'm not sure what you intending on using the 1/4" luan and trim nails for, but 1/2" plywood mending plates with glue would be the method I would trust. Since you/I aren't engineers, overbuilding the trusses from the original looks pretty straightforward. Those metal 'support clips' don't look trustworthy for reuse.
[color=blue]Aaron[/color]
User avatar
Greg
Moderator
Posts: 5696
Joined: Wed Feb 28, 2007 8:01 pm
Location: Weedsport, NY

OK I'll add a 3'rd opinion combining JD's & Aaron's. I think I would go one at a time and use 1/2" plywood. Now to add my 2 cents, If you can find a truss that is not damaged you can make a template to match up once the damaged truss is pushed into place to help keep as original as possible.

Greg
"If I can't fix it, I can screw it up so bad no one else can either."
sndmn2
Posts: 11
Joined: Mon Apr 02, 2012 1:26 pm

Thanks, Good answers from everyone.
1) Are the purlins attached to the top cord ? If so, How would I raise the purlin and the rafter together? I assume I would have to anyways.
2) If I work my way one rafter at a time. What would be the order ? I'm thinking to start at the ends first and work my way to the center. So, furthest one right, then furthest left, back to right, back to left , until it meets in the middle?

Thanks, Rick
User avatar
JD
Site Admin
Posts: 2696
Joined: Sun Feb 25, 2007 11:57 pm
Location: Fresno, CA
Contact:

I also don't care for that metal support. It looks like it helped cause the damage. Truss webbing is usually a mixture of upside down V's made of minimal dimension wood and plywood/paneling plates. As wimpy as they are, they still distribute the weight better than a straight vertical bar. The trusses I see usually have two Vs and one upright, distributing weight to 5 points on the bottom (counting the two ends) and 7 points on the top (counting ends) Some are much better than others.

I use 3/8" cdx plywood for repairs as it is plenty strong enough if fastened well, lightweight and cheap, around $13 a sheet. I use 16ga construction staples and a liquid nail type product.

I have not found much danger in manipulating the trusses or truss parts. I doubt that any of it would actually fall. But the person doing the work needs to ascertain that risk. I usually jack up the bottom cord of the truss using 2 jacks and a 4x4. Again, I over correct a little bit. Then with plywood nail plates, formed to the end shape desired, I attach the ply to the bottom cord, then push up on the top cord until it is in place, then fasten. Having the nail plate in the correct shape is key to my method as it is what you use to place the top cord where it belongs. You can make one master template of an entire truss, and use it to work out the sections of nail plate you want. In your case, you may have to figure out how you are going to handle the truss webbing first.

I don't know if it matters where you start, but I usually just start at one end and go one at a time. I have used stringlines to check my height measurement, but they do get in the way and messed up. Lately I have used my laser level as I can put it out of the way in a corner. I do take a measurement from the floor to level, in case the level gets moved.

That is how I do it anyways. Probably repaired over a hundred in my career. Probably over 200. Been a long career.
☯JD♫
Today is PERFECT!

All information and advice given is for entertainment and informational purposes only. The person doing the work is solely responsible to insure that their work complies with their local building code and OSHA safety regulations.
sndmn2
Posts: 11
Joined: Mon Apr 02, 2012 1:26 pm

Thanks for the responses.
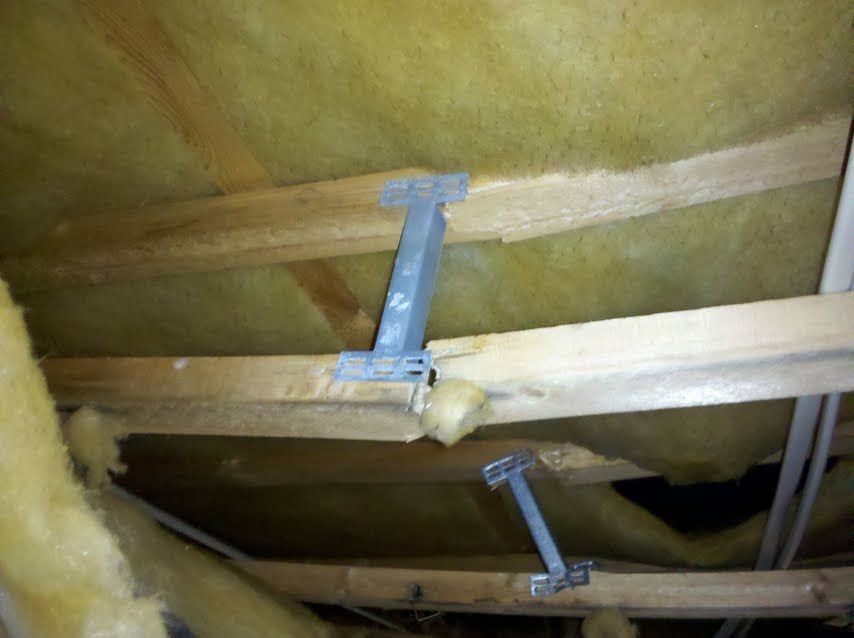
So if I understand, this is the repair procedure.
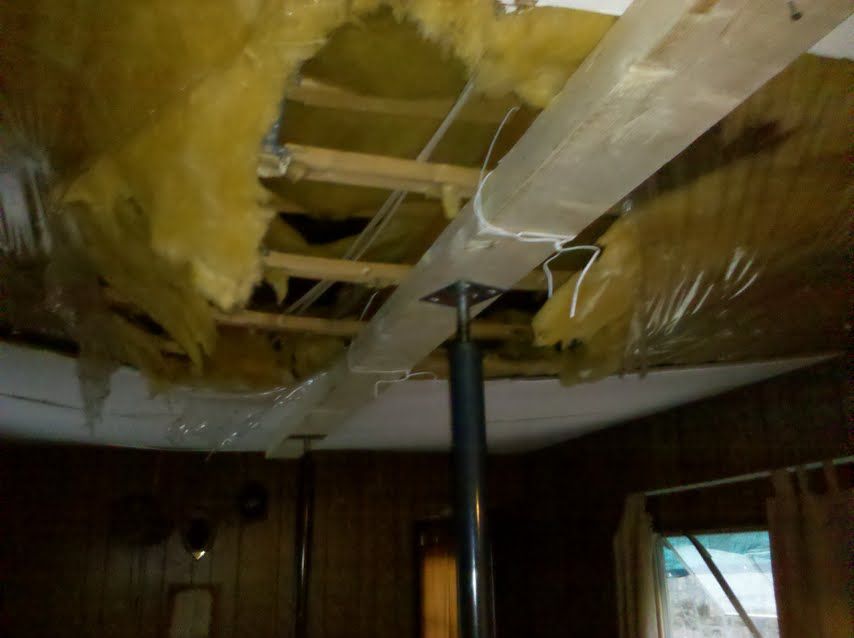
1) Take down enough ceiling tiles for access and clear all old insulation and plastic.
2) Make a template of a known good jacked up truss for repair sections.
3) Repair each truss individually
4) Jack up slightly to over correct
5) Establish correct size of patch. Pretty much half the length of the truss.
6) Push patch into place and align with lower cord. Secure with 16gauge staples and adhesive.
7)Push upper cord into place and again secure
8) Put patch over unbroken clip area on other end of truss for added support.
9) Drill some holes for ventilation.
10) When all is secure and dried ( Let my son be the one who walks on the roof to test it ) :lol:
11) Make any roof seam repairs as needed
12) Wait for a rainy day to test
13) When good , insulate, new plastic and ceiling tiles.
14) Have a drink with buddies Jack, and Hot Damn.

Question: What size crown and leg length of 16 gauge staple ?

Image
User avatar
JD
Site Admin
Posts: 2696
Joined: Sun Feb 25, 2007 11:57 pm
Location: Fresno, CA
Contact:

That is basically how I do it. I would replace that metal stut with wood webbing. The ply needs to be glued and screwed to the webbing as well. It is the plywood being totally secure and stable that gives the repair strength. You don't want the plywood to be able to move or bow in the middle.

As far as making the V webbing design, that really should be designed by an engineer, but I doubt that ever happens. It would be good to look at truss pictures of trusses with the wood web V's to get the design. Maybe using the search feature on this web site would show you some pics. I know many have been posted. But gluing and screwing the ply to an upright 2x would spread the load quite a bit.
☯JD♫
Today is PERFECT!

All information and advice given is for entertainment and informational purposes only. The person doing the work is solely responsible to insure that their work complies with their local building code and OSHA safety regulations.
DaleM
Posts: 385
Joined: Wed Apr 07, 2010 10:07 am

That's alot of work to have something not much better than what you started with. Tear it all out and make new rafters out of solid lumber. You said it was a 12' wide home. Measure the height at the center of your current rafter. That measurement will decide if you need a 2x6, 2x8 or 2x10 lumber to make new rafters. Get a bunch of 12' boards and get going. Go 1 of 2 ways then, 1) use a "good" rafter to trace out a design on the new lumber or 2) design your own, not too tough.
sndmn2
Posts: 11
Joined: Mon Apr 02, 2012 1:26 pm

Well, Upon further inspection last weekend I decided to tear out and replace. Once all the ceiling tile and insulation was out I could get a clear view. There are only a couple that I think could be repaired. But at this point why bother . Each truss is 12ft by 7in. high. It will be tricky moving the jack stands around to get access to each truss individually . I think I'll have to have three different sets. Do you think it will be easier tear out each truss individually while supporting the one's on both sides ? I assume the trusses are nailed on the ends and to the purlins. For this reason I am skeptical of trying to dislodge the top truss cord fro the purlin. Maybe it will be easier to sister up the old truss with the new truss leaving the old one in place. On the other hand I assume the old truss is resting over a stud and this is where I would like the new truss to sit. :? Thoughts ?
Thanks

Oh, The insurance man has no clue on how to price this out for a claim. Can anyone clue me in as to what an average cost per truss would be? I was thinking roughly $200 per truss to cutout and install. I"ll be doing the repairs myself.They won't hire anyone so its cash out to me to take care of things. Truss repair, insulation, ceiling tiles, new flooring , carpet padding.The policy is for 7k. I'm going for it all and hope it comes close when all is said and done.
sndmn2
Posts: 11
Joined: Mon Apr 02, 2012 1:26 pm

O.K. I made my repairs last week. Thanks for the help and suggestions. Glued and nailed my patches into place. Actually they turned out pretty strong as I was able to hang by the lower chords and not bring the ceiling down. As far as insulation, is it o.k. to use 1 inch styro foam as I don't think I'll find 1 inch fiberglass. As far as the roof goes. Since the the joint split and there is no real way to mend it I was going to make a patch out of aluminum coil stock , seal the edges and rivet it.

http://img.photobucket.com/albums/v506/ ... 722072.jpg
http://img.photobucket.com/albums/v506/ ... 722252.jpg
Locked
  • Similar Topics
    Replies
    Views
    Last post