Kitchen "remodel" on a shoestring
Posted: Mon Jan 21, 2008 10:19 pm
I joined this site to get decorating ideas for my MH. Mainly redoing the walls. I thought I might post some pics of a kitchen makeover I did for my Daughter-in-Law last November for her Christmas present, because her kitchen looked as bad as anything I had ever seen and she was so ashamed of it.
The whole point of my post is that we didn't remove or replace anything in the kitchen. However, since the 2 before photos they did get a new stove and sink on their own.
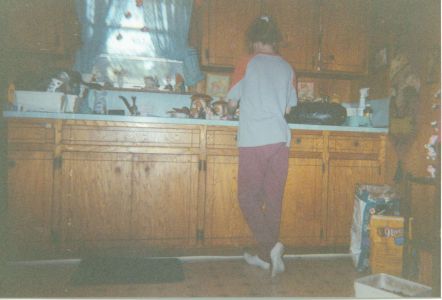
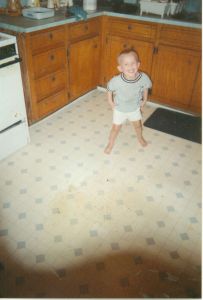
The cabinets doors were old, chipped and outdated and there were two missing doors. The counter tops were scarred and sections of the turquoise laminate had come loose and fallen off, probably back in the 70's. I waited 5 years before I asked my daughter-in-law, Debbie, if I could update her kitchen.
Debbie and I went to Lowes (the only home improvement store in my small lake resort town in Texas) to get supplies. I found ceramic mosaic tile, and because random pieces within each whole tile were broken, I bought 12"x12" tile for the counter tops for $1 each. Then we cut out all chipped tiles and replaced them with unbroken pieces from "donor" tiles. I tiled right over the old laminate countertop. First, I clean with TSP, score and scratch the laminate to give the adhesive more tooth. I have tiled numerous countertops using this method and have never had a single tile come loose. I have a high-end wet tile saw because I do this stuff so often, but you can buy tile cutters for $20 at lowes that will work on most tile.
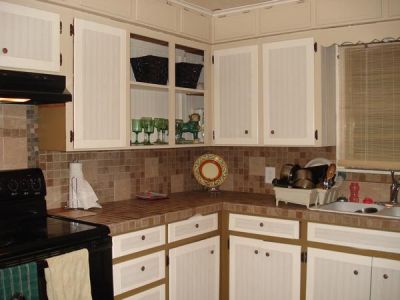
For the cabinets, we painted the frames and doors. Then I bought two rolls of thick, prepasted wallpaper that looked like bead board and we applied it to the door and drawer fronts and even pasted it onto the interiors of the cabinets so they would also look clean and fresh. Rather than dipping the paper into water, I used a clear wallpaper paste for good adhesion and very sharp razor blades and straightedges for clean cuts. This wallpaper is thick and highly scrubbable. I even tested it by using scouring powder on the surface and it wasn't damaged.
I used white vinyl floor tiles (less than $1 each) to make the shelves of the upper cabinets look clean and new. Upper cabinets are 12" deep, so very little cutting was necessary. You just peel off the paper and stick them down onto the old wood surface. You can use sizzors to cut the tiles around obstacles. A tip is that if you put linoleum or floor tile on the wood under your sinks, your cabinet will not warp and be ruined if you develop a leak.
I found door and drawer pulls on closeout for 43 cents each. For the backsplash I bought inexpensive tile to mix with the mosaic because I didn't have enough of the countertop tiles to do the entire project. Debbie and I had such a good time shopping for all our bargains.
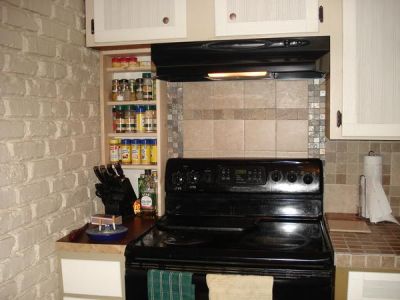
I bought a 12" wide base cabinet and inserted in between the stove and the wall ($50/60 bucks). The stove had always floated in the space and food and spills would run down the sides of the stove and onto the floor. The stove was no longer centered under the overhead cabinets, so I asked my son to make a spice rack. His only input in the project was the spice rack using wood he had in the garage. Debbie and I did everything using girl power. Because I had run out of the countertop tile, I used a thick piece of pine from an IKEA table for the countertop over the new base cabinet.
I splurged and bought one $10 piece of slate mosaic tile for the backsplash behind the stove. We cut it into strips for an accent border, because I didn't have enough of the countertop tile, and I had bought every tile Lowe's had in stock. So we were improvising at this point.
When my son came home from work, he actually thought we had used real beadboard on the door and drawer fronts. He had to touch them before he would believe it was "just" wallpaper. My daughter-in-law is really happy with the results, and it only took a couple days to paint, paper, tile and grout. The cabinet doors are easy to clean and still look brand new after 2 months and 2 kids. If a door is damaged, she can repaper it (we still have a lot of wallpaper left).
We were trying to get done before a birthday party the next day so a couple of things were left undone in the after pictures, such as painting the ceiling of the open cabinet and the side of the cabinet next to the stove, and we didn't have time to get all the door/draw pulls on.
We faux painted the fireplace to the left of the stove a light cream, and put down laminate floor (left over from a flip on another house).
She's loving her "new" kitchen and it was an experience I will always cherish. And we did it on the skimpiest shoe string ever. I hope someone on a tight budget might see this post and be inspired to "think outside the box."

My beautiful family at the Houston Zoo.
The whole point of my post is that we didn't remove or replace anything in the kitchen. However, since the 2 before photos they did get a new stove and sink on their own.
The cabinets doors were old, chipped and outdated and there were two missing doors. The counter tops were scarred and sections of the turquoise laminate had come loose and fallen off, probably back in the 70's. I waited 5 years before I asked my daughter-in-law, Debbie, if I could update her kitchen.
Debbie and I went to Lowes (the only home improvement store in my small lake resort town in Texas) to get supplies. I found ceramic mosaic tile, and because random pieces within each whole tile were broken, I bought 12"x12" tile for the counter tops for $1 each. Then we cut out all chipped tiles and replaced them with unbroken pieces from "donor" tiles. I tiled right over the old laminate countertop. First, I clean with TSP, score and scratch the laminate to give the adhesive more tooth. I have tiled numerous countertops using this method and have never had a single tile come loose. I have a high-end wet tile saw because I do this stuff so often, but you can buy tile cutters for $20 at lowes that will work on most tile.
For the cabinets, we painted the frames and doors. Then I bought two rolls of thick, prepasted wallpaper that looked like bead board and we applied it to the door and drawer fronts and even pasted it onto the interiors of the cabinets so they would also look clean and fresh. Rather than dipping the paper into water, I used a clear wallpaper paste for good adhesion and very sharp razor blades and straightedges for clean cuts. This wallpaper is thick and highly scrubbable. I even tested it by using scouring powder on the surface and it wasn't damaged.
I used white vinyl floor tiles (less than $1 each) to make the shelves of the upper cabinets look clean and new. Upper cabinets are 12" deep, so very little cutting was necessary. You just peel off the paper and stick them down onto the old wood surface. You can use sizzors to cut the tiles around obstacles. A tip is that if you put linoleum or floor tile on the wood under your sinks, your cabinet will not warp and be ruined if you develop a leak.
I found door and drawer pulls on closeout for 43 cents each. For the backsplash I bought inexpensive tile to mix with the mosaic because I didn't have enough of the countertop tiles to do the entire project. Debbie and I had such a good time shopping for all our bargains.
I bought a 12" wide base cabinet and inserted in between the stove and the wall ($50/60 bucks). The stove had always floated in the space and food and spills would run down the sides of the stove and onto the floor. The stove was no longer centered under the overhead cabinets, so I asked my son to make a spice rack. His only input in the project was the spice rack using wood he had in the garage. Debbie and I did everything using girl power. Because I had run out of the countertop tile, I used a thick piece of pine from an IKEA table for the countertop over the new base cabinet.
I splurged and bought one $10 piece of slate mosaic tile for the backsplash behind the stove. We cut it into strips for an accent border, because I didn't have enough of the countertop tile, and I had bought every tile Lowe's had in stock. So we were improvising at this point.
When my son came home from work, he actually thought we had used real beadboard on the door and drawer fronts. He had to touch them before he would believe it was "just" wallpaper. My daughter-in-law is really happy with the results, and it only took a couple days to paint, paper, tile and grout. The cabinet doors are easy to clean and still look brand new after 2 months and 2 kids. If a door is damaged, she can repaper it (we still have a lot of wallpaper left).
We were trying to get done before a birthday party the next day so a couple of things were left undone in the after pictures, such as painting the ceiling of the open cabinet and the side of the cabinet next to the stove, and we didn't have time to get all the door/draw pulls on.
We faux painted the fireplace to the left of the stove a light cream, and put down laminate floor (left over from a flip on another house).
She's loving her "new" kitchen and it was an experience I will always cherish. And we did it on the skimpiest shoe string ever. I hope someone on a tight budget might see this post and be inspired to "think outside the box."
My beautiful family at the Houston Zoo.