

This month featured homes are:
* (top) Known as hvac1000 on our website forum, hvac1000’s home sits in a marina in Indiana with immediate access to water and, from the looks of the picture, a golf course!
* (bottom) Sitting just south of Chicago is the home of Scott, Rochelle, Miranda and Kayla. Features include skylights throughout, stone fireplace, 3 1/2 car detached garage and a recently-added outdoor garden pond.
Welcome and thanks for reading our Summer 2006 newsletter.
In this issue you will find:
• Adding A/C To Your Mobile Home.
• Don’t Burn Out Your Air Conditioner.
• What’s HOT on our Website.
• Wanted: Your Articles.
• A story from ‘The Life of a Mobile Home Repair Man.’
• Square Foot Gardening.
• A Bigger Tub-Shower for Under $50.
• Tip of the month.
• Picture of the month.
ADDING A/C TO YOUR MOBILE HOME
by Mark Bower and Robert Hardy
You either just bought a home without A/C, or this is the summer you swear you will have air conditioning. Whatever the reason, check out our newest hvac article on things you should know when considing adding a/c to your home. Click Here to read the article.
Also worth noting are some changes that the air conditioning industry is also going through. For instance, all new air conditioning units now manufactured must have a minimum seer rating of 13. A seer rating is basically a standard that tells you how efficient the unit run. Of course the higher the rating, the more efficient the a/c unit. So right now 10 & 12 seer units are being phased out, and some parts (like A-coils) are getting difficult to find. Once parts are no longer available, then homeowners will be forced to install the new higher-priced 13-seer unit.
These days most a/c units use a refrigerant called R22. R22 is now being phased out by a new refrigerant called R410A. The US government has mandated that equipment using R22 can no longer be made after 2010. And R22 refrigerant will no longer be manufactured in the US after 2020.
For those of you needing to know more about R410A, here’s some extra tid-bits. R410A contains POE oils, which is different from R22 which contains mineral oils. R410A requires a pink tag or container while R22 requires a green tag or container. R410A operates at 1.6X the pressure of R-22, which means technicians will need to update their guages and equipment to handle the higher pressure. R410A requires a filter drier as vacuum pumps cannot pull the water out of POE oils. Never mix R410A with R22 and do not use R410A in a R22 system. Finally, R410A must still be captured even though it is considered safe for the environment.
DON’T BURN OUT YOUR AIR CONDITIONER
by Mark Bower and Robert Hardy
Your tired of hearing your air conditioner run, so you shut if off. Two seconds later someone yells, “Hey, don’t turn off that a/c, I’m hot!” So you turn it right back on. Guess what — that little ‘on and off’ flick may have just blown your compressor. Now it’s time to open up your wallet and shell-out $600-$800 for a new compressor, or $1200-$2000 for a new a/c unit. Yep, the problem could have been totally avoided if you had a time delay.
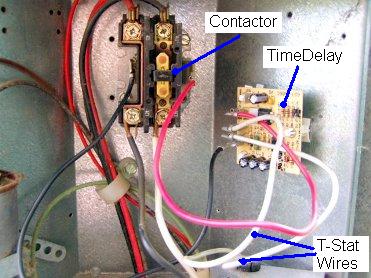
The time delay will not let the compressor start for 5 minutes after it has shut off. This allows the pressures to equalize and the compressor to completely stop running before it can re-start. Starting it too soon is a good way to burn-up a compressor. The delay on break timer is connected between the thermostat wire and contactor. If your a/c doesn’t have a delay timer, you will soon be able to order one from us in a matter of days. It might just save you a huge repair bill and from having to weather a few hot days with no a/c.
WHAT’S HOT ON OUR WEBSITE
Furnace and A/C Parts. Along with Coleman parts, we’ve also begun to add Nordyne parts which include Intertherm. Also available are wiring and parts diagrams, along with troubleshooting help.
AUTOMATIC SKIRTING VENTS: Tired of trying to guess when you should open and close your skirting vents? Then maybe you need an automatic skirting vent. Inside the vent is a spring similiar to that found in a thermostat. When the temperatures get cold, the vents close. When the temperatures get warm, they open. No batteries or power required! (pictured right)
We wrote the manual on mobile home repair. The Manual for Manufactured/Mobile Home Repair & Upgrade is jam packed with pictures and ideas for repairing and upgrading your mobile home. Now on sale for the summer fix-up season.
PARTS FEATURE: Does your home have those self-contained switches and outlets (switch, box & cover all as one piece). We constantly get e-mails asking where replacements units can be found. We’re happy to announce that we’ve found a source — Ashville Mobile Homes. They warehouse all their own parts. Check them out! Read their About Us page. It’s a hoot.
WANTED: YOUR ARTICLES
by Mark Bower
Summer is here, and the home fix-up season is under way. Many of you keep us up-to-date with your latest projects by posting in our Forums. We appreciate hearing about them.
We want you to continue posting to the forum, but we’re also looking for new articles to add to our site. If you’re doing a project that your might proud of, why not ‘archive’ it with us for the world to see forever! You worked hard, so let that pride come through.
Requirements for articles are pretty simple. First, it should be a topic we haven’t written much about. If your topic is similar, then go for it. You must submit several clear digital pictures with your article. Your article should contain details of the steps performed to complete the job. If you hired someone to do the job for you, that’s OK, just tell us what they did. It doesn’t matter if you’ve already posted to the forum or photo album, you can submit the same project to us. Topics that are real technical in nature (electricity, gas, etc) may not be approved unless you are a licensed technician in that field, or you hired one.
Finally, we’ll be your editor so don’t worry about how well you do or don’t write. No matter how much we ‘edit’, you remain the author. We’re searching for articles for all aspects of our website — mobile home repair, rv repair, hvac, alternative energy and work-at-home.
A STORY FROM ‘THE LIFE OF A MOBILE HOME REPAIR MAN’
by Mark Bower
In this newsletter issue I don’t really have one story to tell you about. But I do have several incidents that I definitely shook my head over.
1) An older lady customer wanted a new front door. So I stopped over and measured-up the opening. I said I think I have a door in stock for you, but it doesn’t have a window. Oh, that was unacceptable. A window she must have. So I ordered her a door with a window. This story is strange because, as her daughter also pointed out, that window has been sealed off with a piece of cardboard since the day her Mom moved in!
2) A customer called and said they could hear a leak under her bathroom floor. So I drove over for an inspection. Sure enough they had a leak, but I was unable to access it from underneath the home due to several factors like the house sitting so low and axles being in the way. The customer wasn’t around, so I left a note with her options — none of them cheap.
I never heard back until 2 weeks later. The customer called and said that fixing the leak should be no problem now because the bathroom floor had now caved in and the pipe was easily accessible. Yep it was!
3) One of our local dealers sell both mobile homes and campers. The other day I got a call from the dealer asking if I’d skirt a camper. Wahhh! Red flags go up big time. Anyone wishing to skirt a camper up here in the Dakotas must be going to live in it year-a-round. And, yep, I was right.
He chose to buy a new camper instead of a mobile home to permanently live in. He has no intentions of moving the camper. I said the guy is crazy. If this was Florida or Arizona southern California, then I’d consider it a routine request. But up here in the south Artic! He’ll never make it through the winter. Campers have walls that are less than 2″ thick. Windows are usually drafty single-pane glass. Furnaces tend to be small and may not keep up. The dealer said they told him all that, but he still wanted a camper. At the time I write this, I haven’t yet decided if I’m going to do the job or not. I fear that every time he freezes up (and it will), he’ll blame the skirting. It could be a headache I surely don’t want
4) This afternoon my son’s cubscout leader calls. He says they are making a go-cart at tonight’s meeting, and asked if I had a cordless drill they could borrow. I said ‘sure.’ Now let me translate that phone call for you. When the leader called, he was really asking if I’d personally come to the meeting and bring my service van full of tools and help them build it. And my translation was correct — I showed up with my service van and by the time the go-cart was built, I had about half the tools out of my van! But in the end, it was a neat project and the kids had a blast building the go-cart as well as riding it (and us parents had fun helping!)
SQUARE FOOT GARDENING
Is your mobile home on a small rented lot? Do you have the desire to garden but lack the space? With Square-Foot Gardening, you don’t need a lot of room. Learn more from Master Gardener Donna Adrian.
SQUARE FOOT GARDENING
by Mark Bower
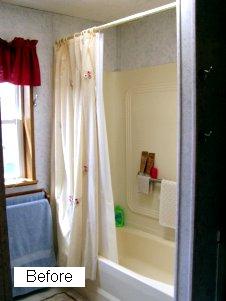

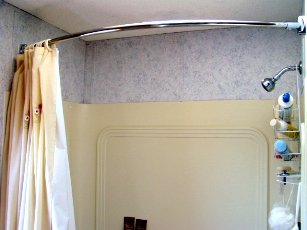
It’s no secret that mobile homes use some of the smallest bathtubs made. In my home we all use the shower in our tub that measures only 27″ x 54″. Not a lot of room! However, we just made our shower bigger, and it cost me less than $50 and took under an hour.
All I did was replace our standard curtain rod with a curve-shaped rod. What a difference! Maybe the greatest innovation in bathroom design in the past 30 years! The rods are designed for a 60″ long tub. For shorter 54″ bathtubs like mine, I had to cut 2-3″ off each end of the rod using a hacksaw. If you don’t have a stud to screw the ends into, you might want to pick-up a few thin-wall anchors to help with the job.
After I installed one of these shower rods in my bathroom, my 8-year-old son was the first to try out the new shower. He swears I put in a bigger bathtub! LOL. Amazing what a few inches does to the perception of space.
These rods are available in better home improvement stores for $30-$50+, or everywhere on the internet.
TIP OF THE MONTH
Testing an Electric Water Heater Element
If you have an electric water heater and suddenly find your water luke warm, you could have a bad heating element. Here’s how to test yours.
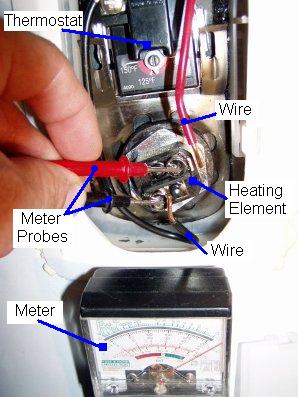
1) Shut power off to water heater at breaker panel.
2) Using a screwdriver, remove the covers to expose the elements and thermostats. Most electric water heaters have two, but some may only have one.
3) Snap off the plastic shields that cover the element connections.
4) With your meter set to ‘volts’, doublecheck that indeed you have no power by touching the probes of the meter to the screws on the end of the element. If no power, set your meter to ‘ohms’ or ‘resistance’. You’ll know you have the right setting if you touch together the two meter probes and your meter beeps or the needle jumps to the far side.
5) Remove the two wires connected to the element.
6) Touch the screws of the heating element with the probes of the meter. If the meter beeps or the needle jumps to the far side, your heating element is good. If the meter doesn’t beep or the needle hardly moves, then most likely your heating element is bad and should be replaced.
7) If both heating elements appear to be good, then the problem may be with either the upper or lower thermostat (of course water heaters with just one element only have one thermostat).
To replace a heating element, first purchase a special wrench designed to unscrew the element from the water heater (some elements are bolted in and won’t require the wrench, but those are much less likely to be found in a mobile home). Once you have the wrench, shut the power off to your heater. Drain the water from the tank. Remove the wires from the heating element, then remove the element. Replace with a new element of the same size and wattage. Fill the tank back up with water THEN turn the power back on. Never turn the power on while the tank is empty or you’ll be replacing the elements all over again. If your problem is a bad thermostat, those can be replaced without draining water from the tank. But be sure to shut off the power before replacing!
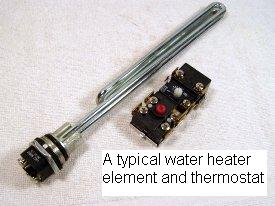
Note: If your heating element is so corroded that you are unable to remove it without damaging the tank, then replacing the water heater may be your best option.
PICTURE OF THE MONTH
photograph by Penny Bower